Storing OIDC Client Secrets via Vault
Goal
This guide explains how to store OIDC client secrets (for example, a Microsoft Entra ID application client secret) outside the Keycloak database by using Keycloak vault file mode, with the secret value supplied from an external secret store such as Azure Key Vault.
By default, when you configure an Identity Provider in DynamoAI-Keycloak and paste a client secret into the Admin Console, Keycloak persists that value in its database. Vault mode lets you keep only a vault reference in Keycloak configuration, while the actual secret remains in your organization's secret store and is delivered to Keycloak as a mounted file at runtime.
For the purpose of this guide, we refer to:
- Customer-IdP — Your enterprise identity system (for example, Microsoft Entra ID) that issues the OIDC client credentials.
- DynamoAI-Keycloak — The DynamoAI application's Keycloak instance deployed in your environment.
- External secret store — Your organization's vault (for example, Azure Key Vault) that holds the OIDC client secret.
This guide complements IdP setup guides such as Entra ID as IdP. Follow those guides for registering the application and configuring the Identity Provider; use this guide when you want the Client Secret field to reference a vault-backed value instead of storing the plaintext secret in the Keycloak database.
Why use vault mode?
Keycloak stores Identity Provider configuration — including client secrets — in its database. Even when the database is encrypted at rest, anyone with database access can read those values.
Vault mode addresses this by:
- Keeping the real secret in your external secret store (for example, Azure Key Vault), subject to your organization's access control, rotation, and audit policies.
- Persisting only a vault expression such as
${vault.entra-client-secret}in Keycloak configuration, not the secret itself. - Allowing infrastructure tooling (for example, the Azure Key Vault Secrets Store CSI Driver) to sync the secret into a file that Keycloak reads at runtime.
Overall Approach
The high-level steps are:
- Enable Keycloak vault file mode by setting the vault provider environment variables on DynamoAI-Keycloak.
- Provide the secret to Keycloak by mounting a file from your external secret store into the Keycloak vault directory, using the required filename format.
- Reference the vault secret when creating or updating the Identity Provider: enter
${vault.<secret-name>}in the Client Secret field instead of the plaintext value.
Pre-Requisites
- Access to update DynamoAI-Keycloak deployment configuration (environment variables and volume mounts).
- An OIDC client secret already created in Customer-IdP (for example, an Entra ID app registration client secret — see Entra ID as IdP).
- An external secret store that can sync secrets into files on the Keycloak pod (Azure Key Vault with the Secrets Store CSI Driver is the reference pattern in this guide; other file-based sync mechanisms work the same way from Keycloak's perspective).
- Familiarity with adding an OpenID Connect Identity Provider in the
dynamo-airealm.
Task-1 : Enable Keycloak Vault File Mode
Configure DynamoAI-Keycloak with the following environment variables:
| Environment variable | Value | Purpose |
|---|---|---|
KC_VAULT | file | Enables Keycloak's built-in file-based vault provider. |
KC_VAULT_DIR | /vault/secrets | Directory where Keycloak looks for secret files. |
After these variables are applied, restart (or redeploy) Keycloak so the vault provider is active.
NOTE: Keycloak does not call Azure Key Vault (or other cloud vault APIs) directly. It only reads plaintext files fromKC_VAULT_DIR. Your platform team must sync secrets from the external store into that directory.
Task-2 : Provide the Secret to Keycloak
Secret file naming
Keycloak's file vault resolves secrets using this filename pattern:
{realmName}_{secretName}
| Component | Example | Description |
|---|---|---|
realmName | dynamo-ai | The Keycloak realm where you configure the Identity Provider. For DynamoAI application login, this is dynamo-ai. |
secretName | entra-client-secret | The logical name you will use in the ${vault....} expression. Choose a stable, descriptive name. |
For an Entra ID client secret used in the dynamo-ai realm, the file must be named:
dynamo-ai_entra-client-secret
and mounted at:
/vault/secrets/dynamo-ai_entra-client-secret
The file contents must be the plaintext client secret value only (no JSON wrapper or extra whitespace beyond what the secret itself requires).
Mounting from Azure Key Vault
Typical pattern on Kubernetes:
- Store the OIDC client secret in Azure Key Vault.
- Grant the Keycloak workload identity (or equivalent) permission to read that secret.
- Use the Secrets Store CSI Driver (or an equivalent sync mechanism) to mount the secret as a file at
/vault/secrets/dynamo-ai_entra-client-secreton the Keycloak pod.
The same approach works with other secret managers that can materialize secrets as files in KC_VAULT_DIR. From Keycloak's perspective, only the file path and naming convention matter.
dynamo-ai_ in the example above). If the file name does not match {realmName}_{secretName}, Keycloak will not resolve ${vault.<secretName>}.
Task-3 : Reference the Vault Secret at IdP Creation
When you configure the OpenID Connect Identity Provider in DynamoAI-Keycloak (for example, following Entra ID as IdP — Task-2):
-
Open the
dynamo-airealm in the Keycloak Admin Console. -
Create or edit the Identity Provider as usual (discovery endpoint, Client ID, scopes, and so on).
-
In the Client Secret field, do not paste the plaintext secret from Customer-IdP.
-
Enter the vault expression instead:
${vault.entra-client-secret}The name after
vault.must match the{secretName}portion of the mounted filename. For a file nameddynamo-ai_entra-client-secret, the expression is${vault.entra-client-secret}.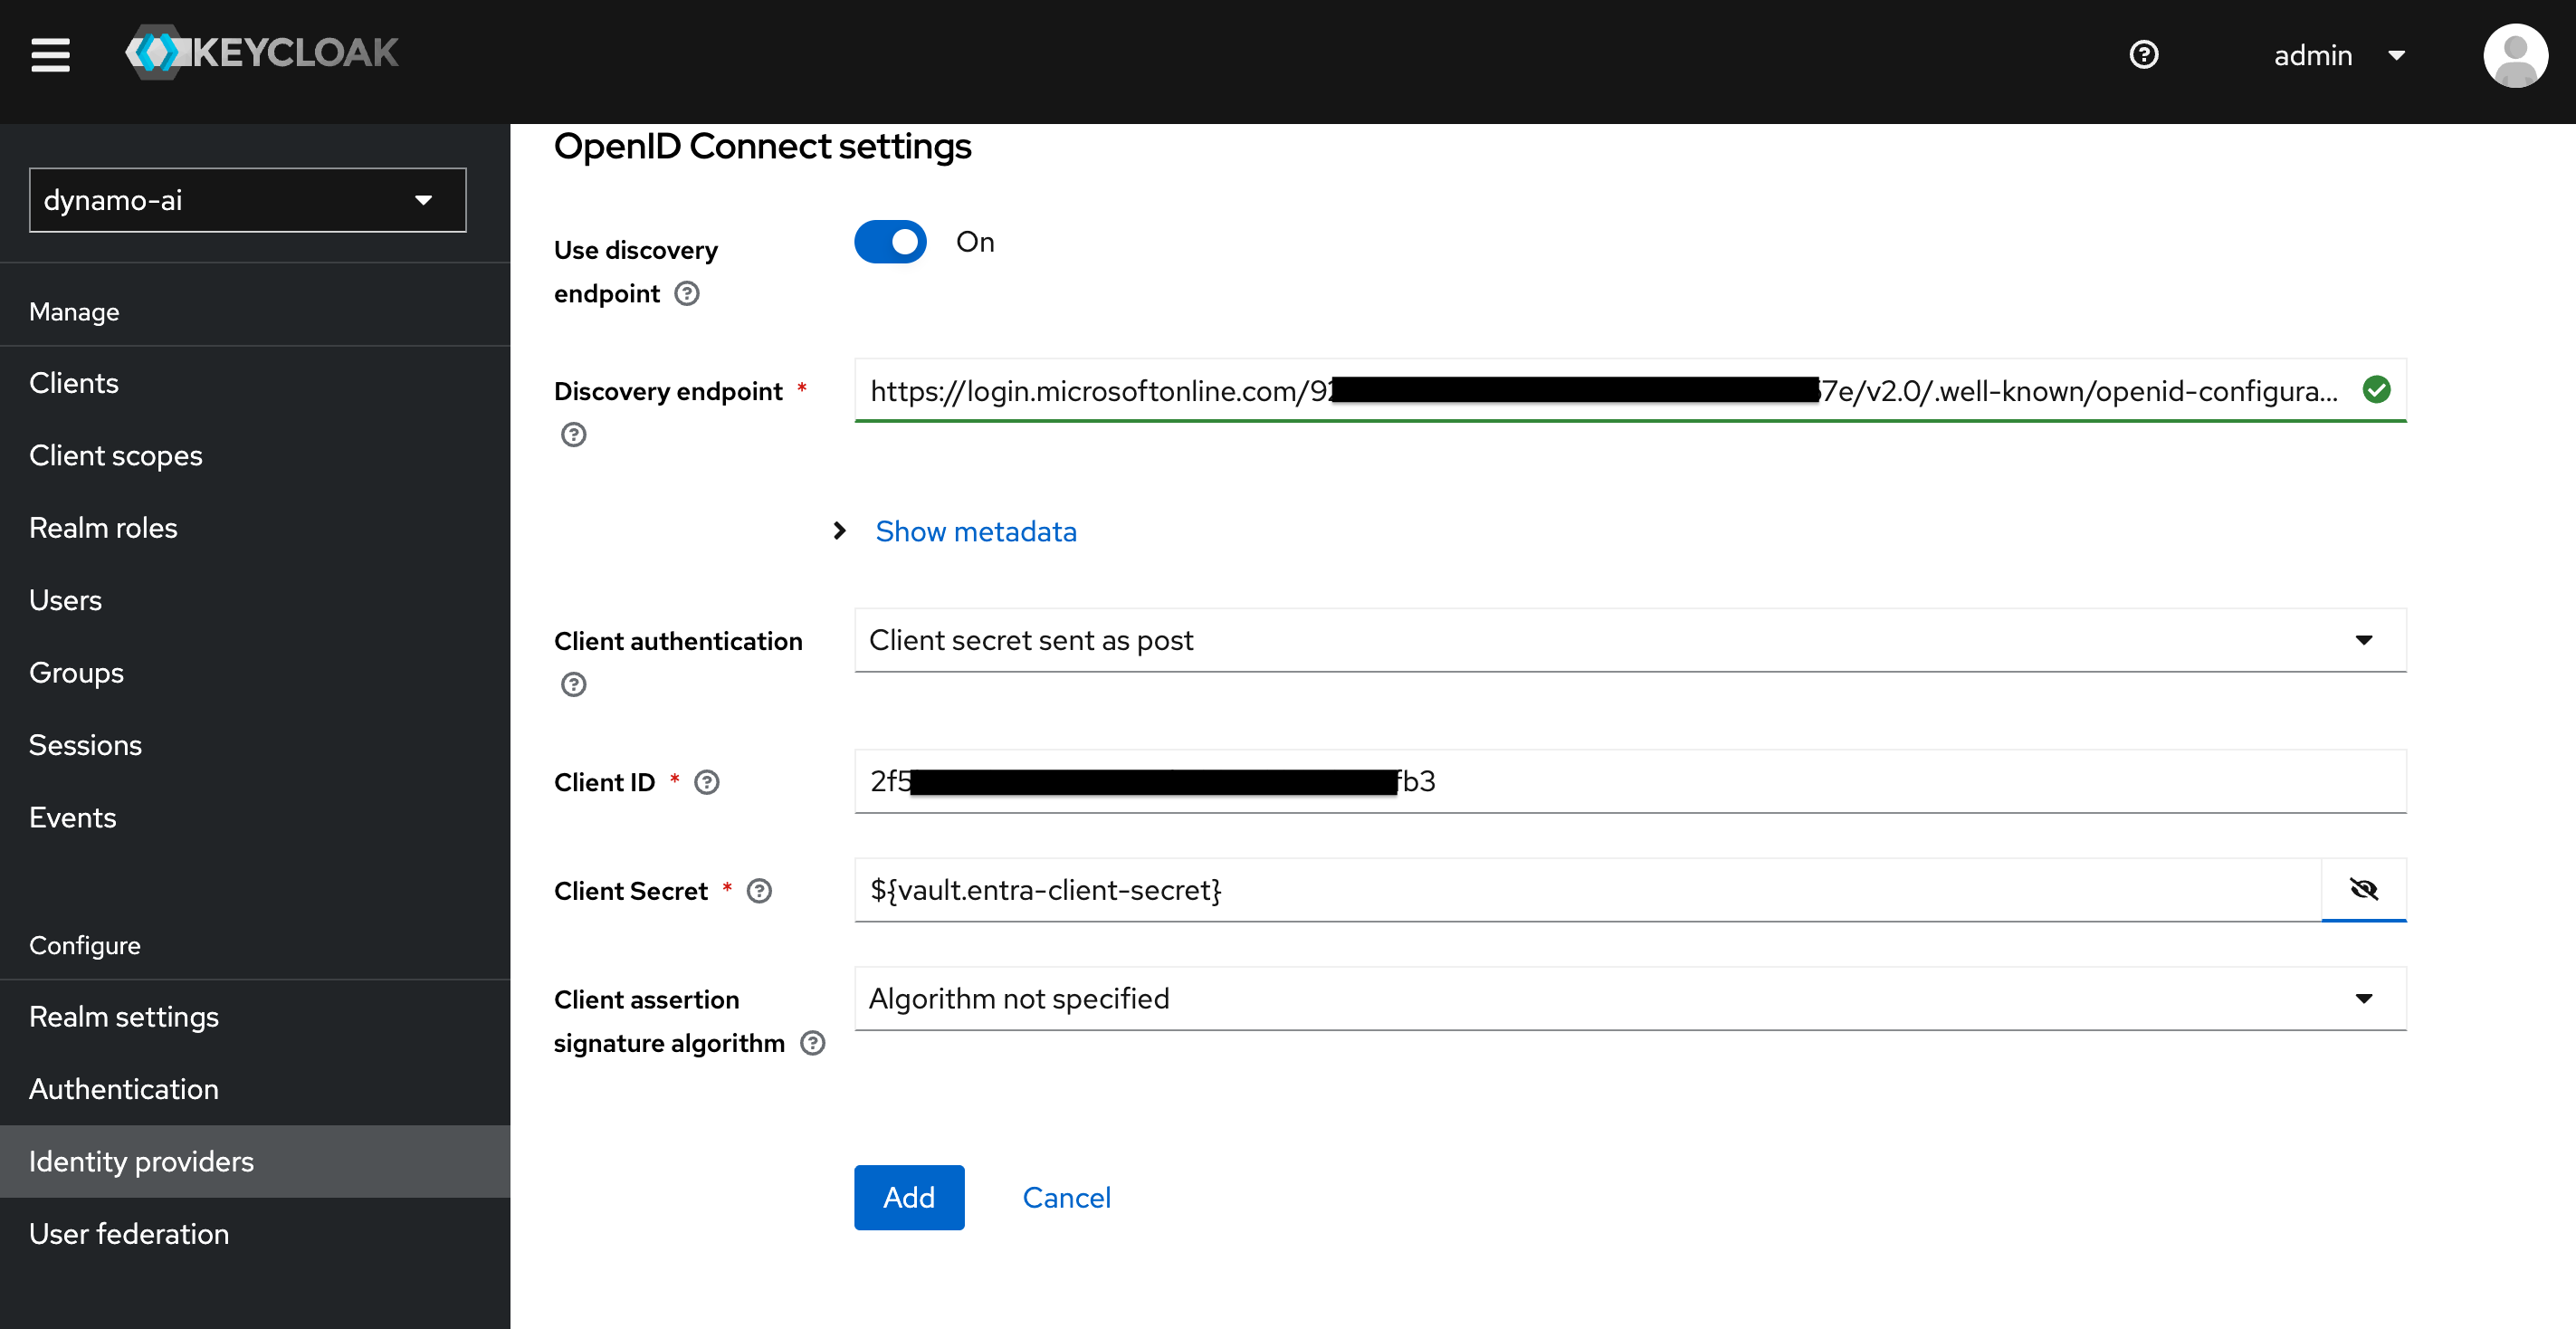
-
Save the Identity Provider.
| What you configure | Example value |
|---|---|
| Mounted file path | /vault/secrets/dynamo-ai_entra-client-secret |
| File contents | The actual Entra (or other IdP) client secret |
| Client Secret in Keycloak Admin Console | ${vault.entra-client-secret} |
Keycloak stores the expression ${vault.entra-client-secret} in its configuration. At runtime, it reads the secret value from the mounted file when authenticating against the IdP.
master realm, the file would be named master_<secretName> and referenced as ${vault.<secretName>}.
Testing
- Confirm the secret file exists on the Keycloak pod at the expected path (for example,
/vault/secrets/dynamo-ai_entra-client-secret) and contains the correct secret value. - Confirm
KC_VAULT=fileandKC_VAULT_DIR=/vault/secretsare set on Keycloak. - In the Keycloak Admin Console, open the Identity Provider and verify Client Secret shows
${vault.entra-client-secret}(or your chosen vault expression), not the plaintext secret. - Open the DynamoAI application login page and sign in via the configured IdP. Authentication should succeed.
- Optionally rotate the secret in Azure Key Vault (or your secret store), allow the CSI driver (or sync tool) to update the mounted file, and confirm IdP login still works with the new value without changing the Keycloak Admin Console configuration.
Related Guides
- Entra ID as IdP — Register an Entra ID application and configure it as an Identity Provider in the
dynamo-airealm. - Keycloak as IdP — Use another Keycloak instance as IdP; the same vault expression pattern applies to its client secret.
- Keycloak Web Console via IdP — IdP-based access to the Keycloak Web Console (
masterrealm); usemaster_<secretName>if storing that client secret via vault.