Entra ID as IdP
Goal
Given you as a customer use Microsoft Entra ID (formerly Azure Active Directory) to manage your users, and DynamoAI's Keycloak is deployed in your environment, this guide enables Entra ID to act as an Identity Provider (IdP) for DynamoAI's Keycloak instance. Users managed in Entra ID can sign in to DynamoAI without being registered separately in DynamoAI-Keycloak.
For the purpose of this guide, we refer to the two systems as:
- Customer-Entra-ID — Your Microsoft Entra ID tenant where users and groups are managed.
- DynamoAI-Keycloak — The DynamoAI application's Keycloak instance deployed in your environment.
Overall Approach
With the naming convention above, we will perform two major steps:
- In Customer-Entra-ID, register an application and configure it for OpenID Connect authentication against DynamoAI-Keycloak.
- In DynamoAI-Keycloak, register Microsoft Entra ID as an OpenID Connect Identity Provider using the discovery endpoint and application credentials from Customer-Entra-ID.
- When logging in to the DynamoAI application, Customer-Entra-ID users can choose to sign in via the registered IdP and do not need separate accounts in DynamoAI-Keycloak.
Tasks
Task-01 : Preparing Customer Entra ID for Integration as an IdP
Pre-Requisites
-
Realm — All configuration in DynamoAI-Keycloak must be performed in the
dynamo-airealm. This is the realm DynamoAI uses for authentication. Confirm the realm selector in the top-left of the Keycloak Admin Console showsdynamo-aibefore proceeding with Task-2. -
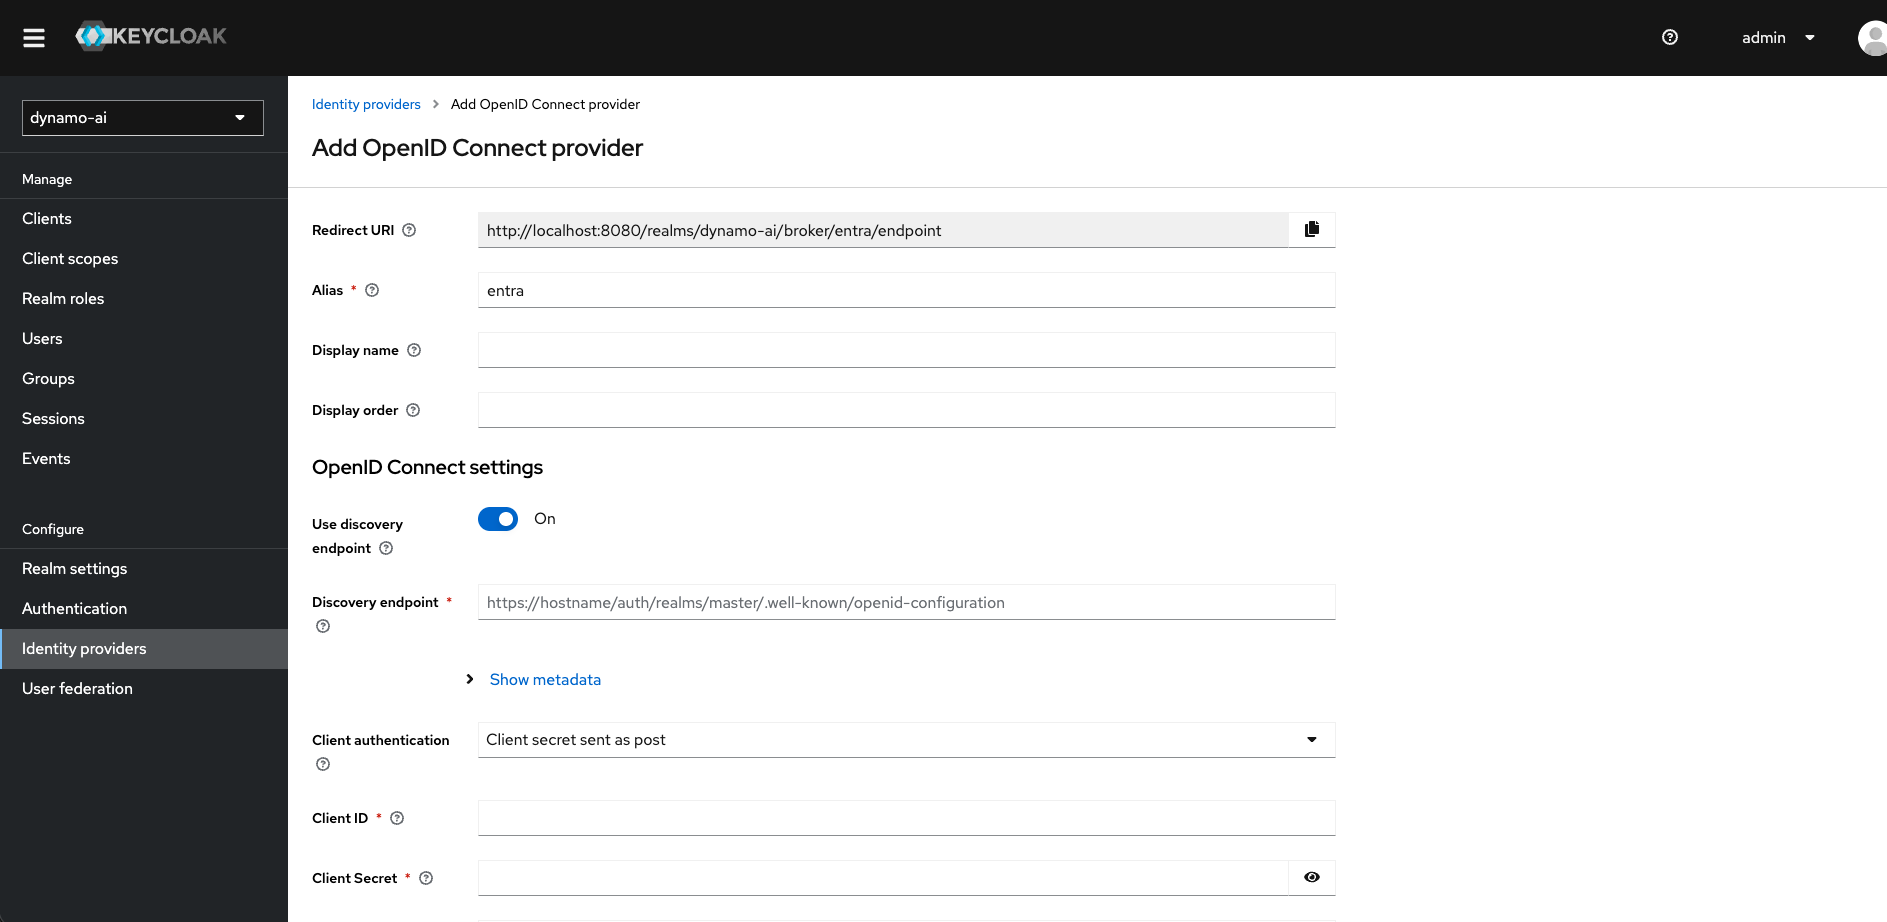
Redirect URI — This is the redirect URL for the DynamoAI-Keycloak instance deployed in your environment. You can find it when adding an Identity Provider in the
dynamo-airealm (see Task-2). The format is:https://<dynamoai-keycloak-domain>/realms/dynamo-ai/broker/<idp-alias>/endpoint
Steps
NOTE: All the below steps are performed in the Customer-Entra-ID (Azure Portal).-
Access Microsoft Entra ID
- Sign in to the Azure Portal.
- Navigate to Microsoft Entra ID (or search for "Entra ID" in the top search bar).
-
Register an Application
-
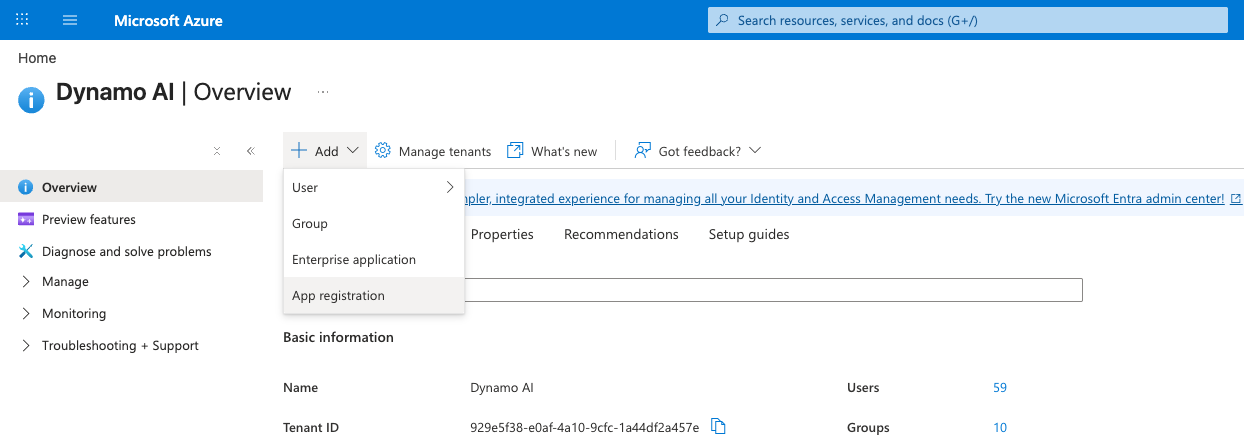
Click on App registration in the +Add section.
-
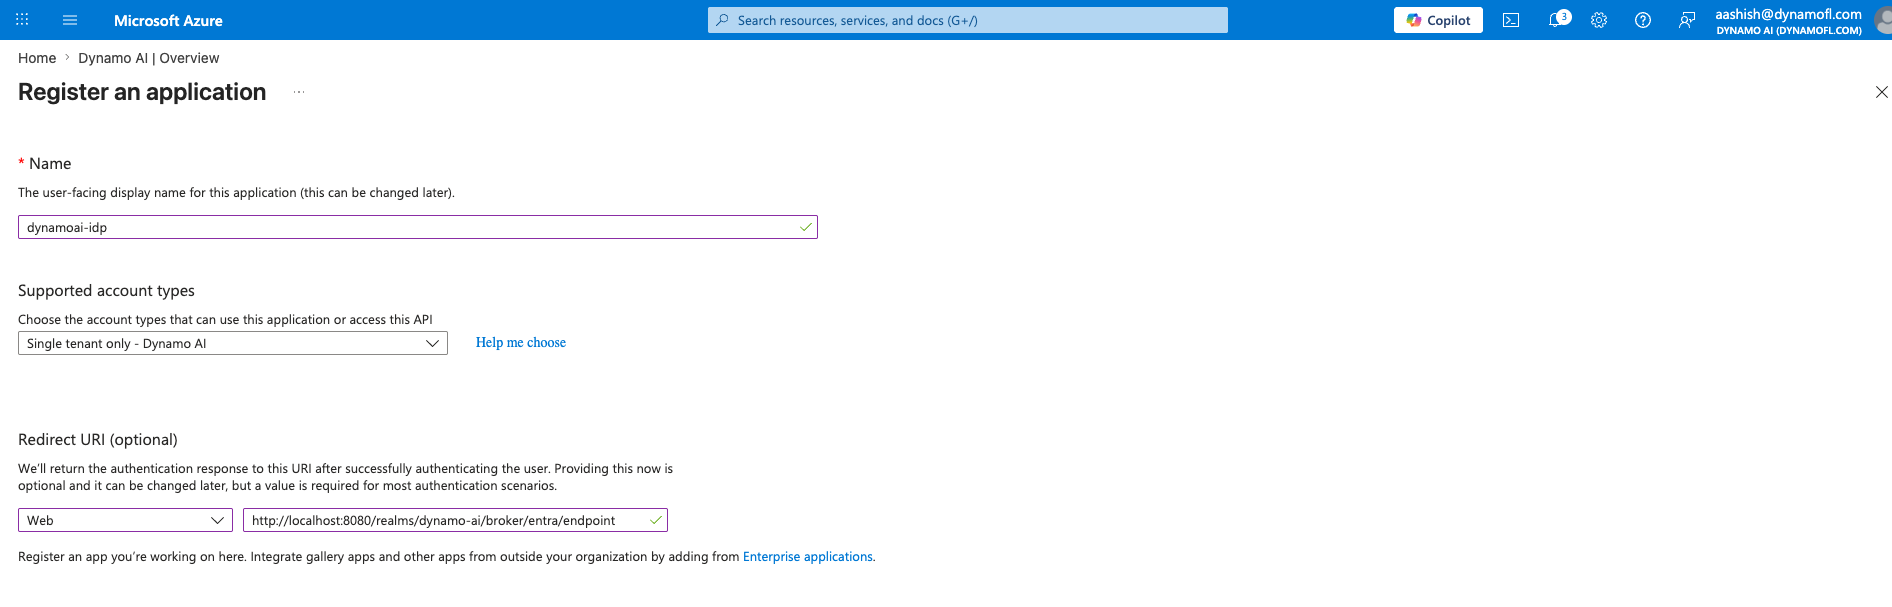
Enter a name for the application (for example,
dynamoai-idp). -
Under Supported account types, choose the option that matches your organization:
- Accounts in this organizational directory only — Single tenant (most common for enterprise deployments).
- Accounts in any organizational directory — Multi-tenant, if users from other Entra ID tenants must also sign in.
-
Under Redirect URI, select Web and enter the redirect URI from Pre-Requisites.
-
Click Register.
-
-
Note Application Identifiers
After registration, on the application's Overview page, record the following values. You will need them in Task-2:
Value Where to find it Application (client) ID Overview page Directory (tenant) ID Overview page 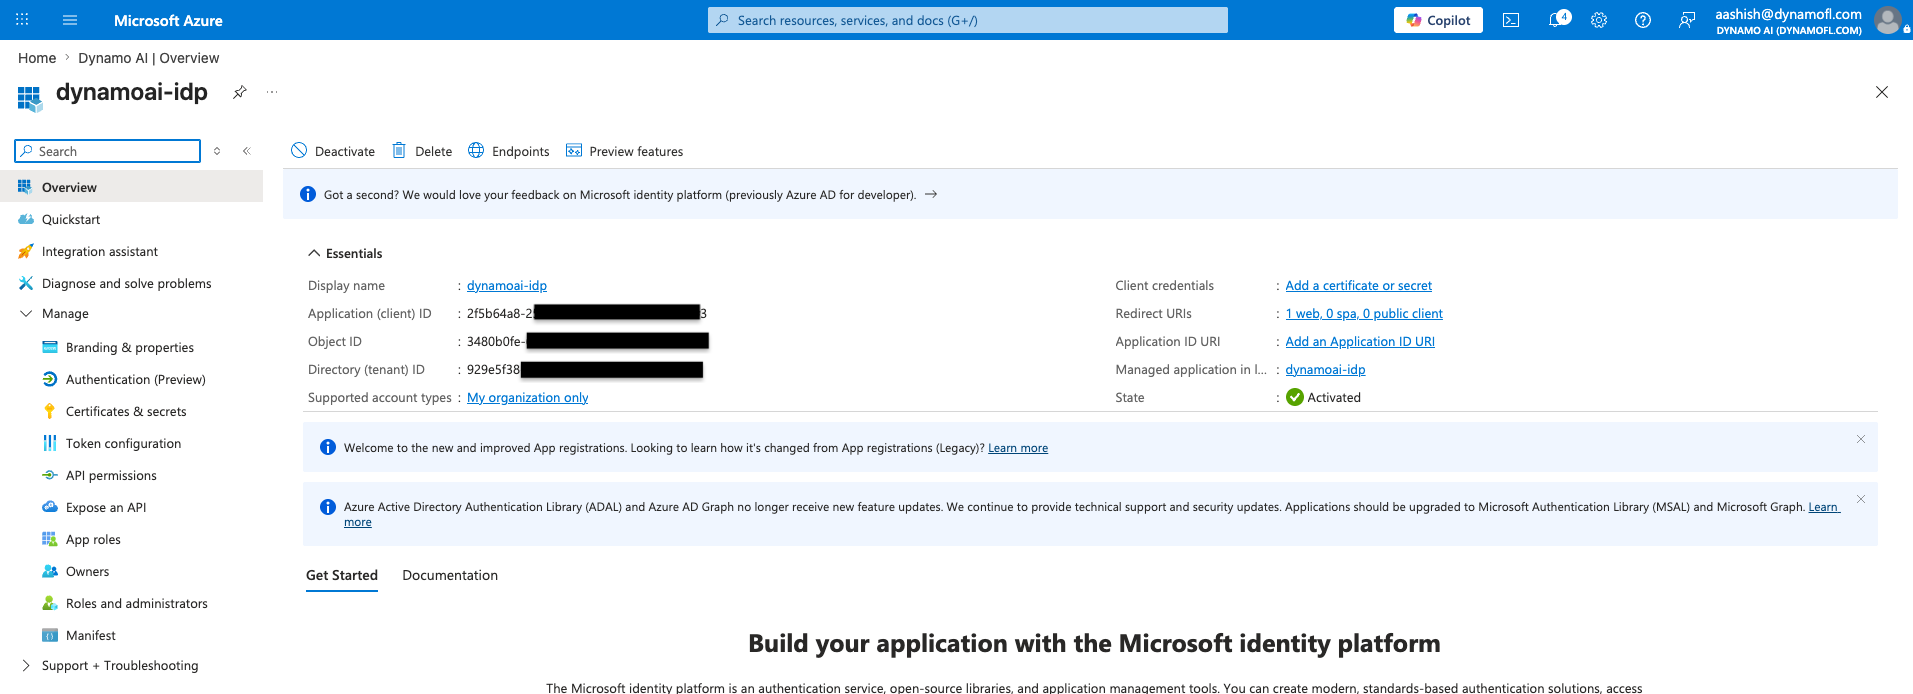
-
Create a Client Secret
-
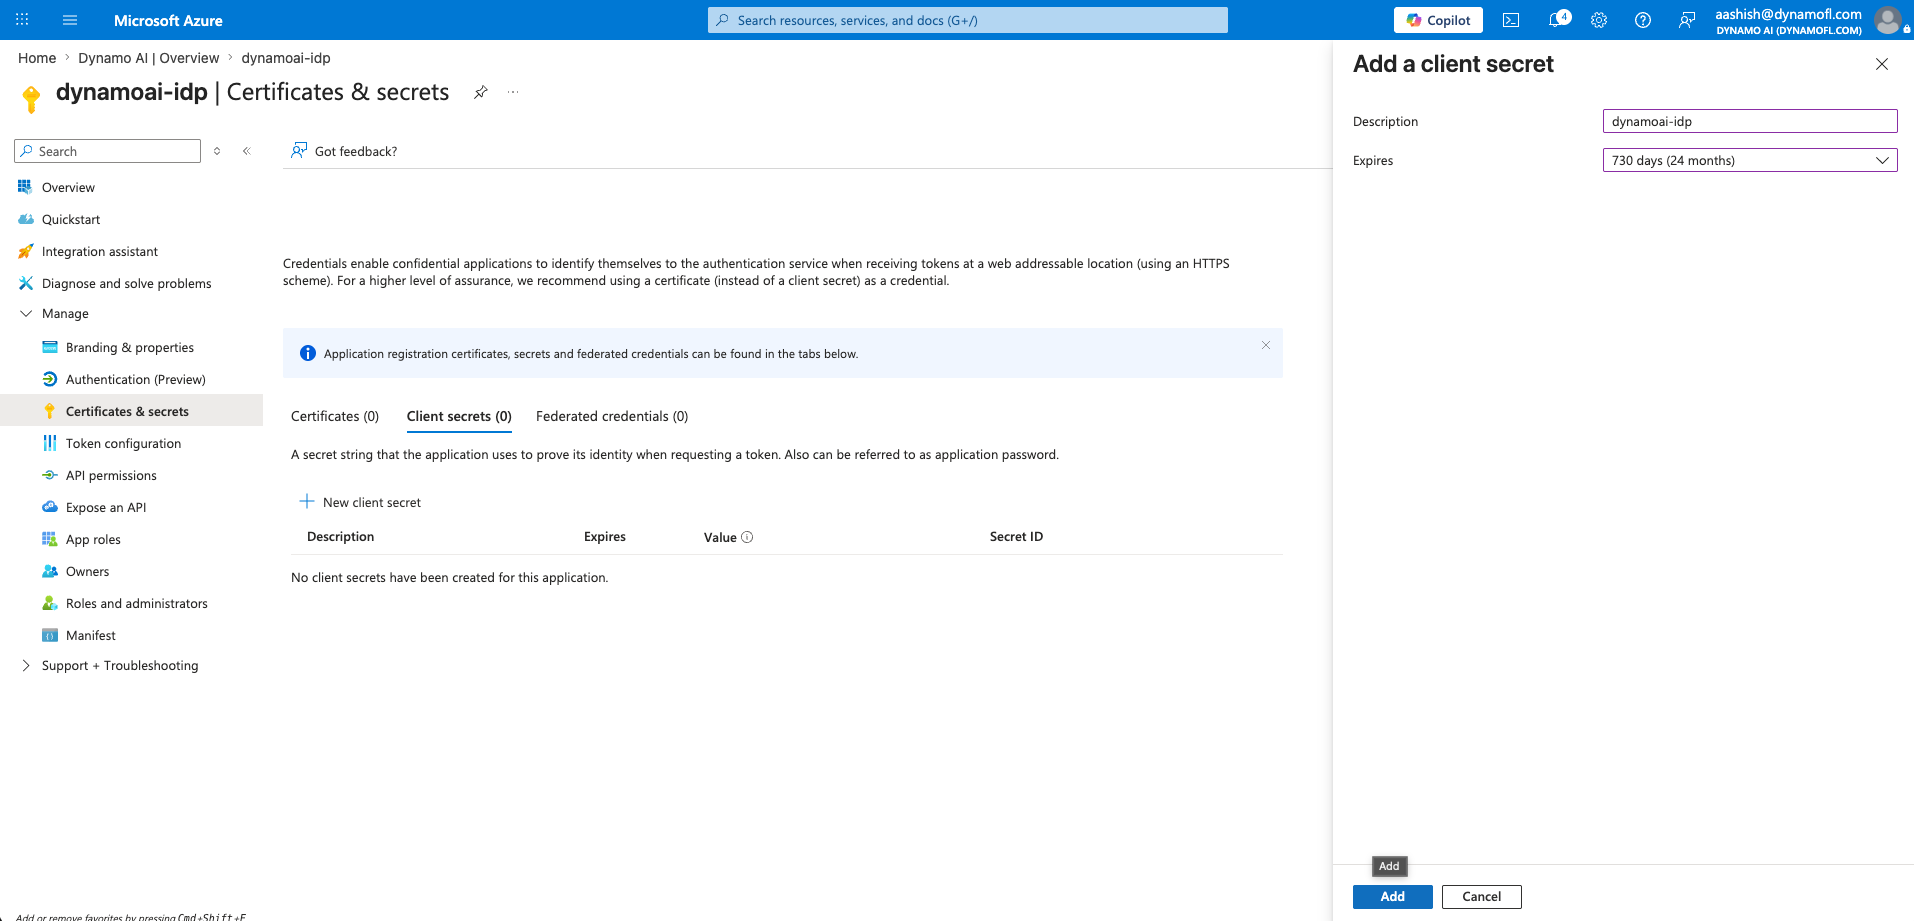
Go to Certificates & secrets in the left-hand menu.
-
Under Client secrets, click New client secret.
-
Enter a description and choose an expiry period.
-
Click Add.
-
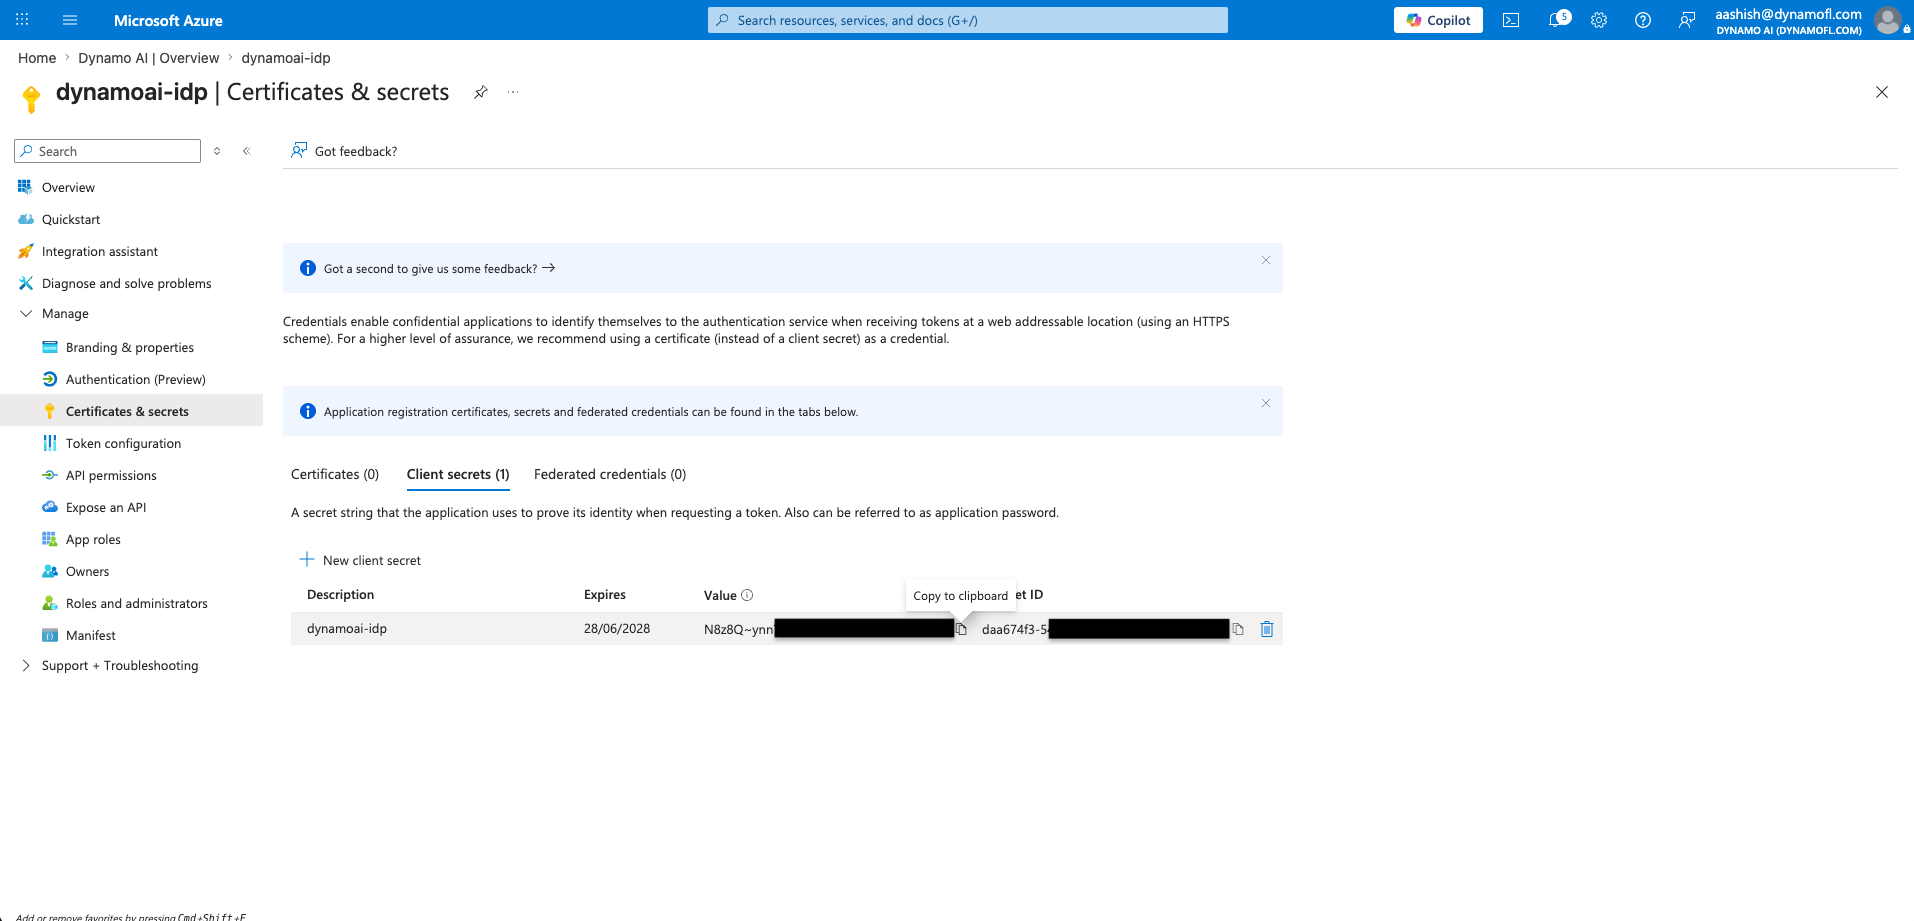
Copy the Value of the secret immediately and store it securely. It will not be shown again after you leave the page.
-
-
Configure API Permissions
-
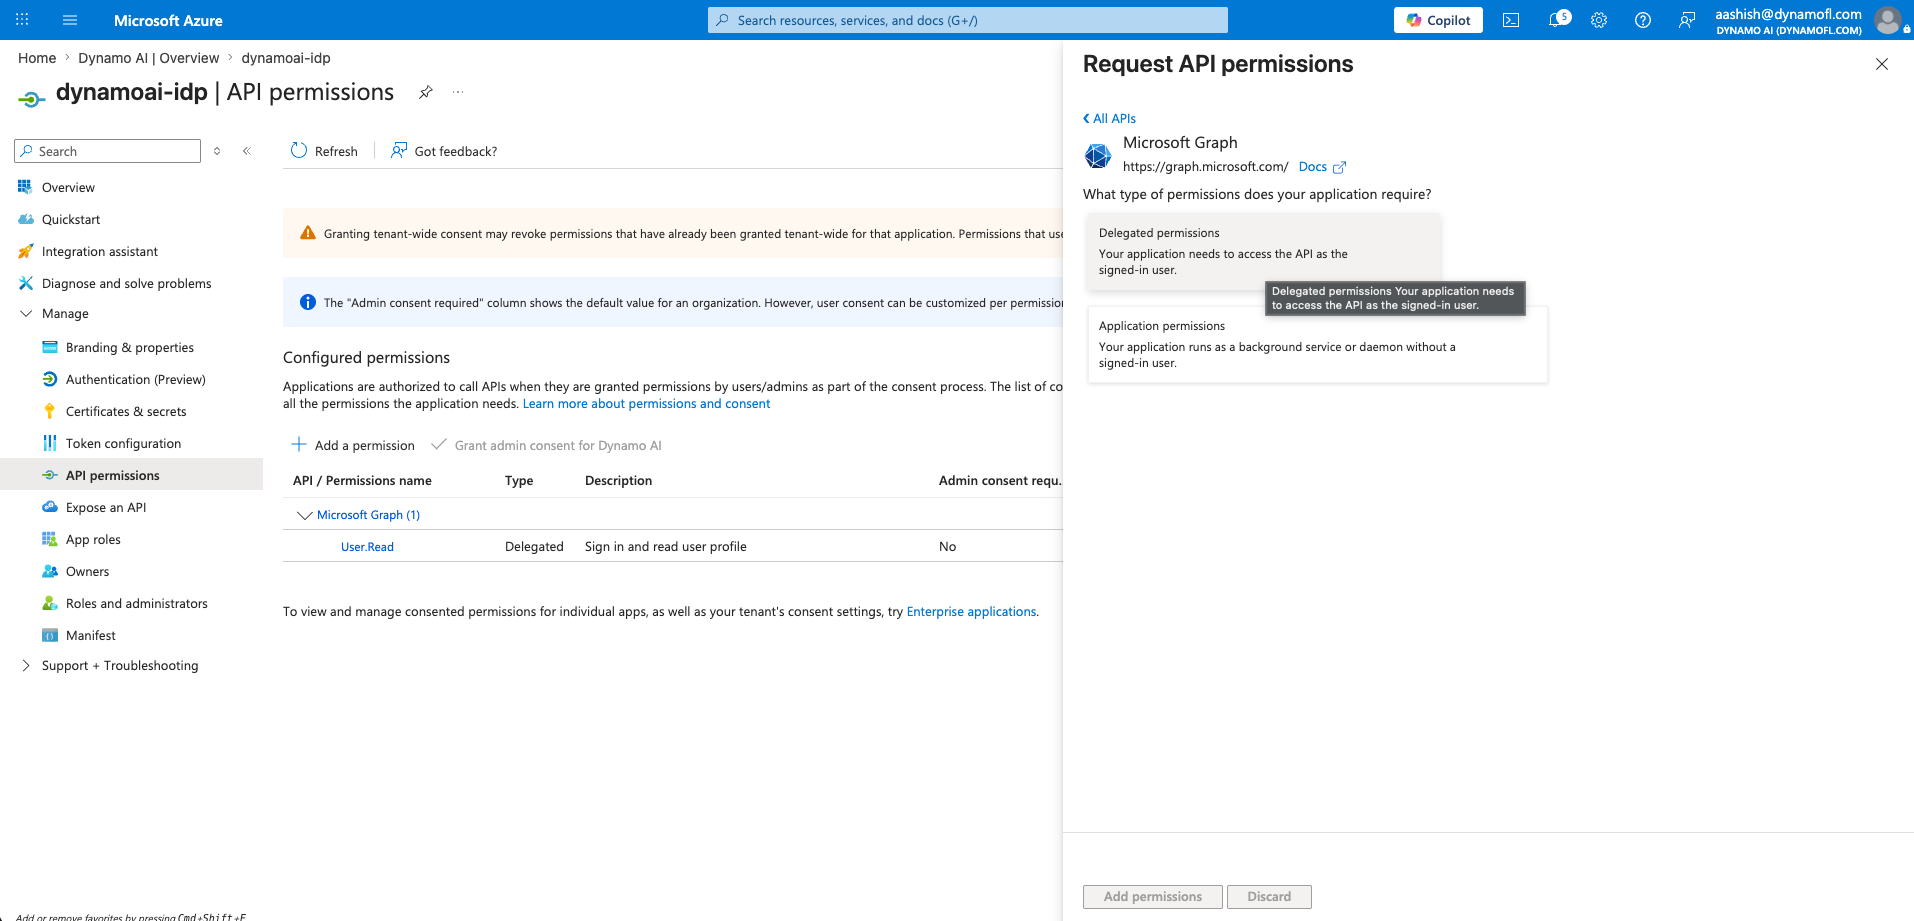
Go to API permissions in the left-hand menu.
-
Click Add a permission, select Microsoft Graph, then choose Delegated permissions.
-
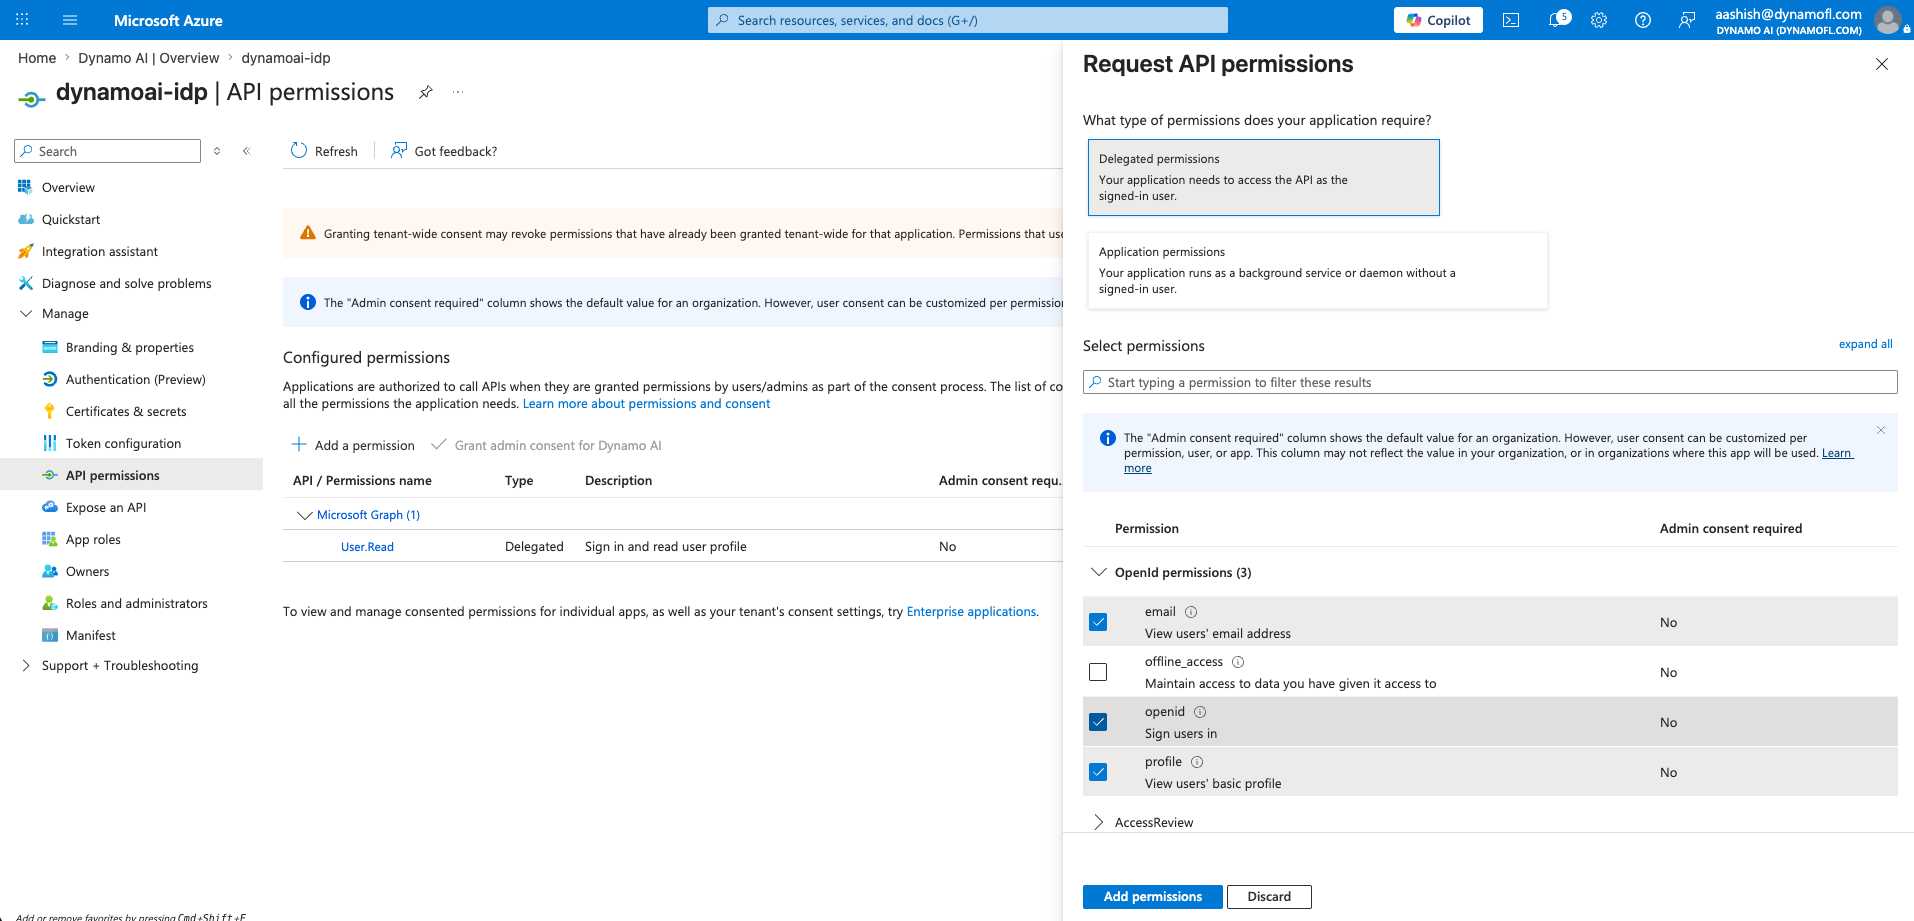
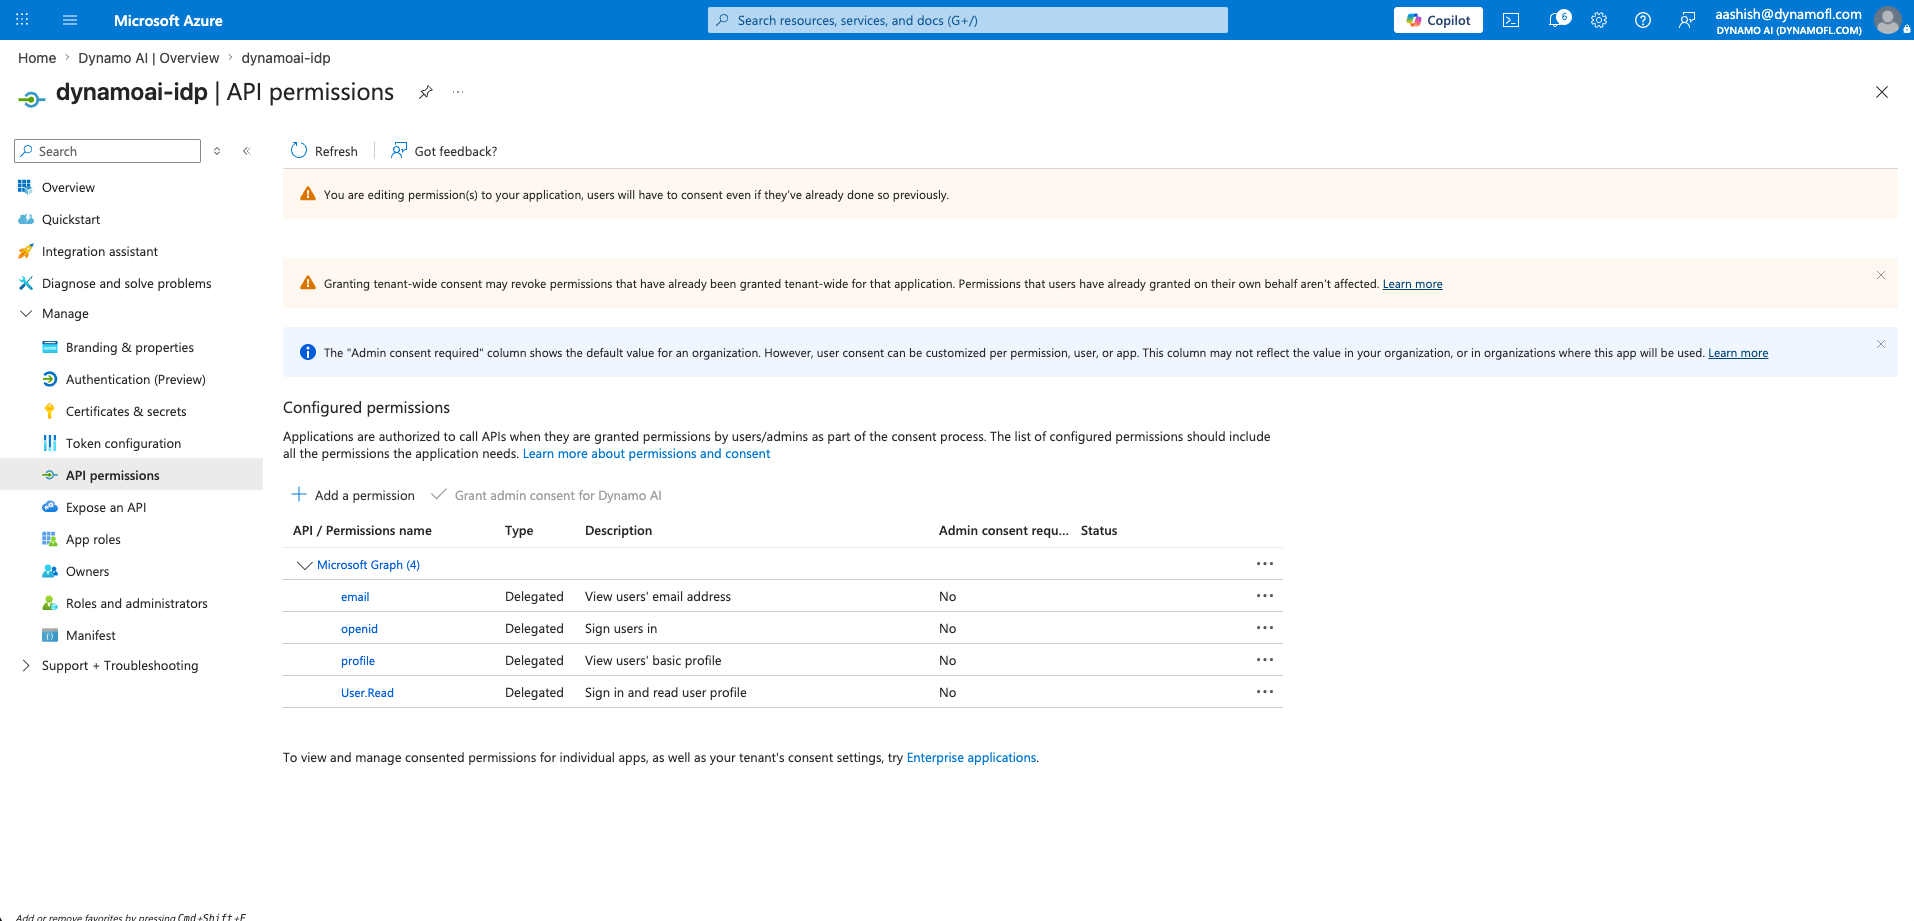
Add the following permissions if they are not already present:
openidprofileemailUser.Read
-
Confirm the final permissions list includes all four scopes. If your organization requires admin consent, have a Global Administrator grant consent via Grant admin consent for <tenant>.
-
-
Add the Email Claim
DynamoAI resolves the signed-in user by email on every request, so a token without one causes failures that do not look like IdP problems — a profile-completion prompt on first login, and later errors when the platform cannot match the user to its own records.
Entra ID only emits an
emailclaim when the user'smailattribute is populated in the directory. Many organizations store the address in the UPN instead, so add the claim explicitly rather than assuming it is present:- In the app registration, go to Token configuration.
- Click Add optional claim, choose the ID token type.
- Select
email, and alsoupnas a fallback for users whosemailattribute is empty. - Save.
Verify rather than assumeDecode an ID token from a test sign-in and confirm
emailis present. If it is not, the directory is not populatingmailfor that user — map the UPN onto the email attribute as described in Adding Mappers.
Key Values
Keep the following values handy for Task-2. Replace <tenant-id> with your Directory (tenant) ID.
-
Discovery endpoint:
https://login.microsoftonline.com/<tenant-id>/v2.0/.well-known/openid-configurationYou can copy this from the app registration Overview page by clicking Endpoints and selecting OpenID Connect metadata document.
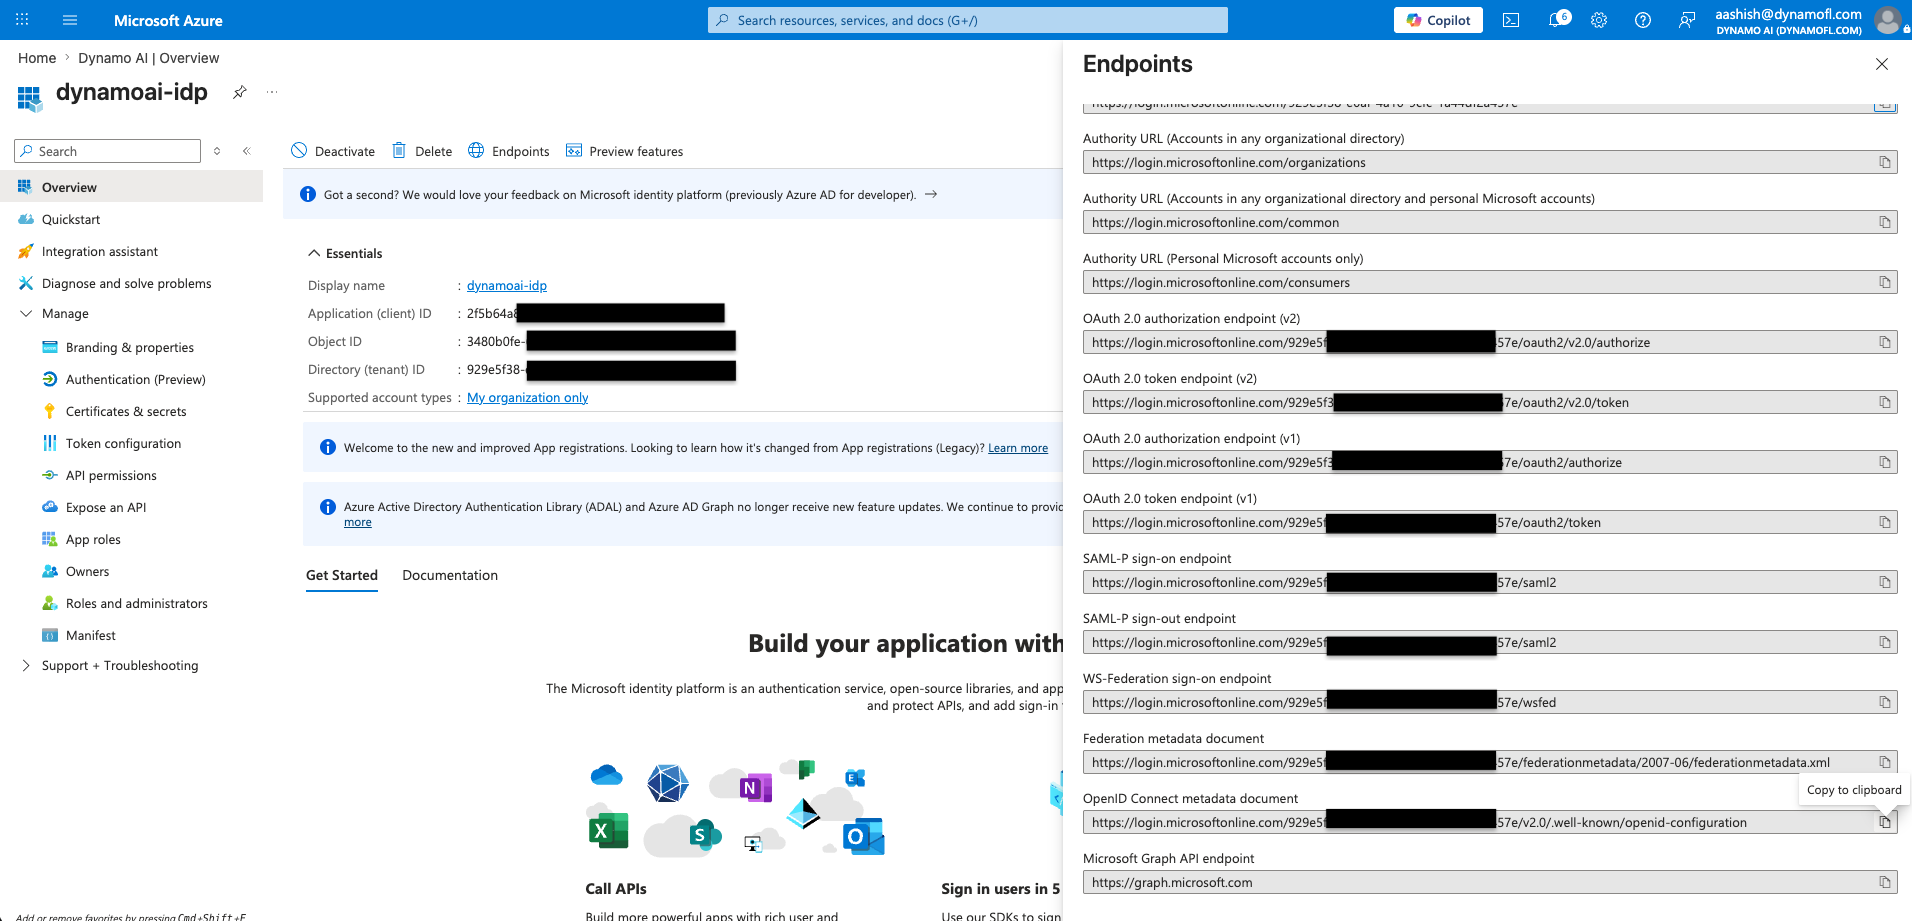
Keycloak uses this URL to automatically resolve the Authorization URL, Token URL, JWKS URL, and other OpenID Connect settings. You do not need to enter those endpoints manually.
-
Client ID: The Application (client) ID from the app registration.
-
Client Secret: The secret value created in step 4 above.
Task-2 : Integrating Entra ID in DynamoAI Application
Steps
NOTE: All the below steps are performed in DynamoAI-Keycloak.-
Access DynamoAI Keycloak
Visit the DynamoAI-Keycloak Admin Console and sign in. Select the
dynamo-airealm from the realm dropdown in the top-left corner. All remaining steps in this task must be completed within this realm. -
Add Identity Provider
-
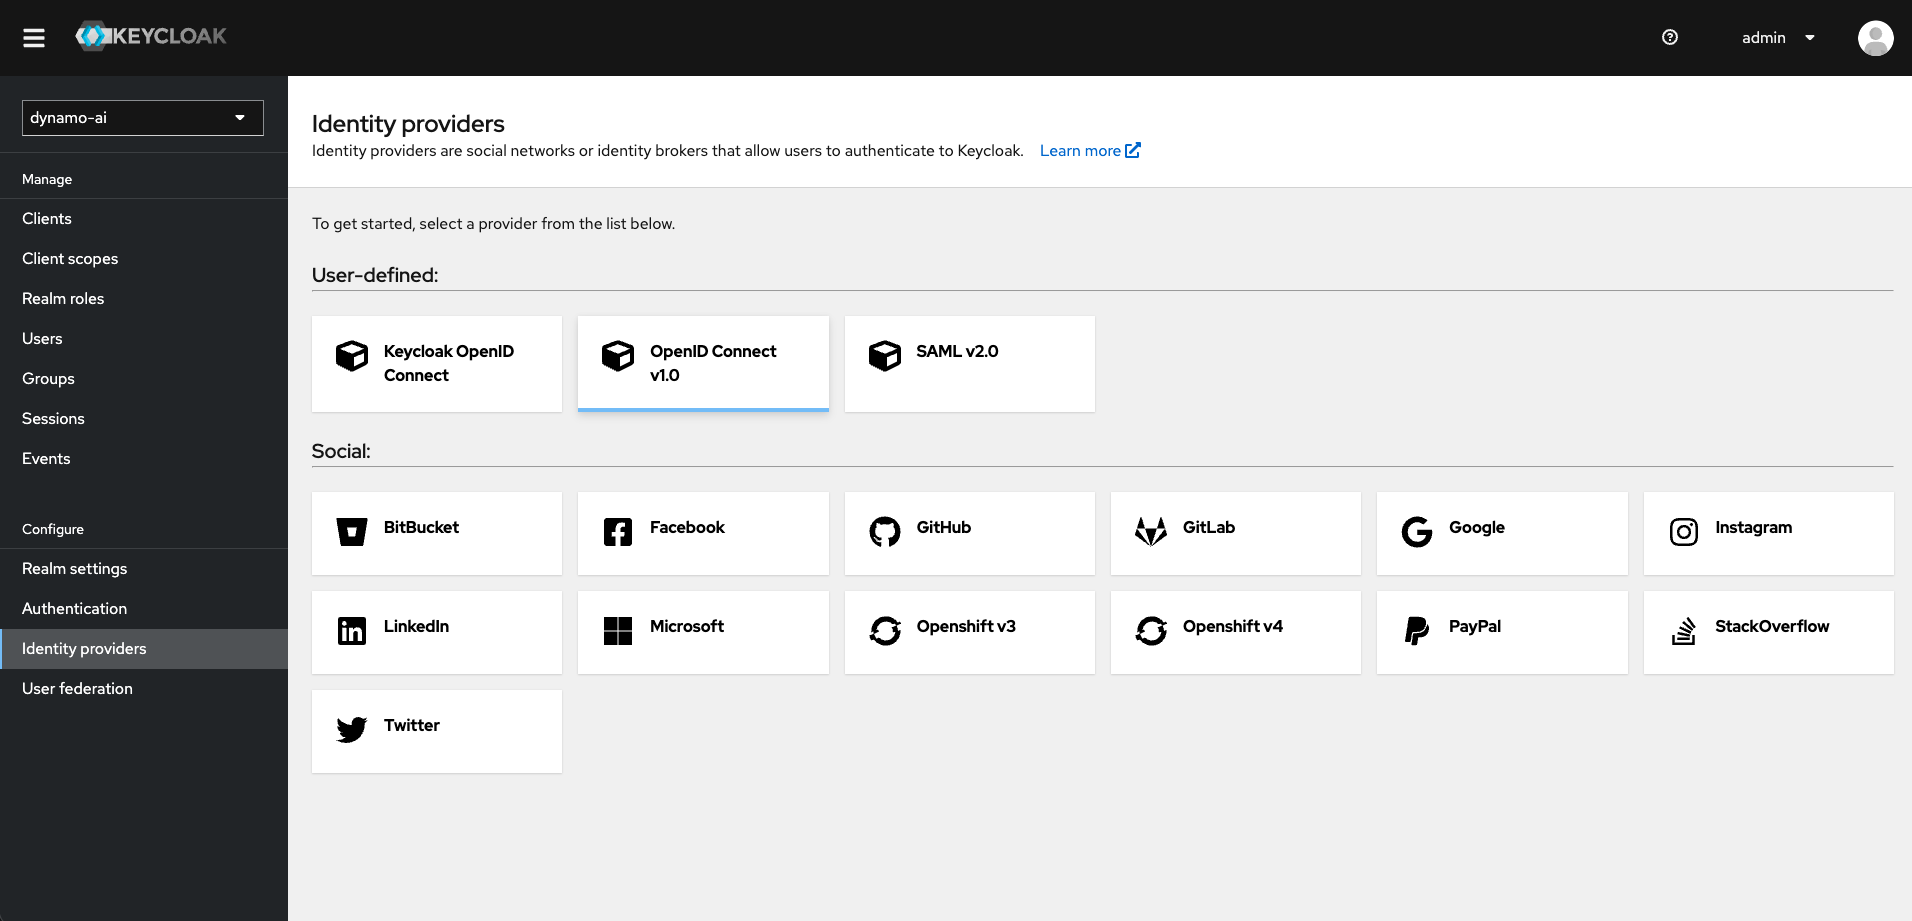
Go to Identity Providers in the left-hand menu.
-
Click Add provider and select OpenID Connect v1.0.
-
Copy the Redirect URI shown on this page and confirm it matches the redirect URI configured in Customer-Entra-ID in Task-01.
-
-
Configure IdP via Discovery Endpoint
Keycloak uses the discovery endpoint to populate the Authorization URL, Token URL, JWKS URL, and Issuer automatically — you do not need to enter those fields manually.
-
Set Alias and Display Name.
Setting Value Alias A short identifier (for example, entra). This appears on the login page.Display Name A user-facing label (for example, Sign in with Microsoft).Enable Use discovery endpoint, then enter the Discovery endpoint from Task-01.
https://login.microsoftonline.com/<tenant-id>/v2.0/.well-known/openid-configuration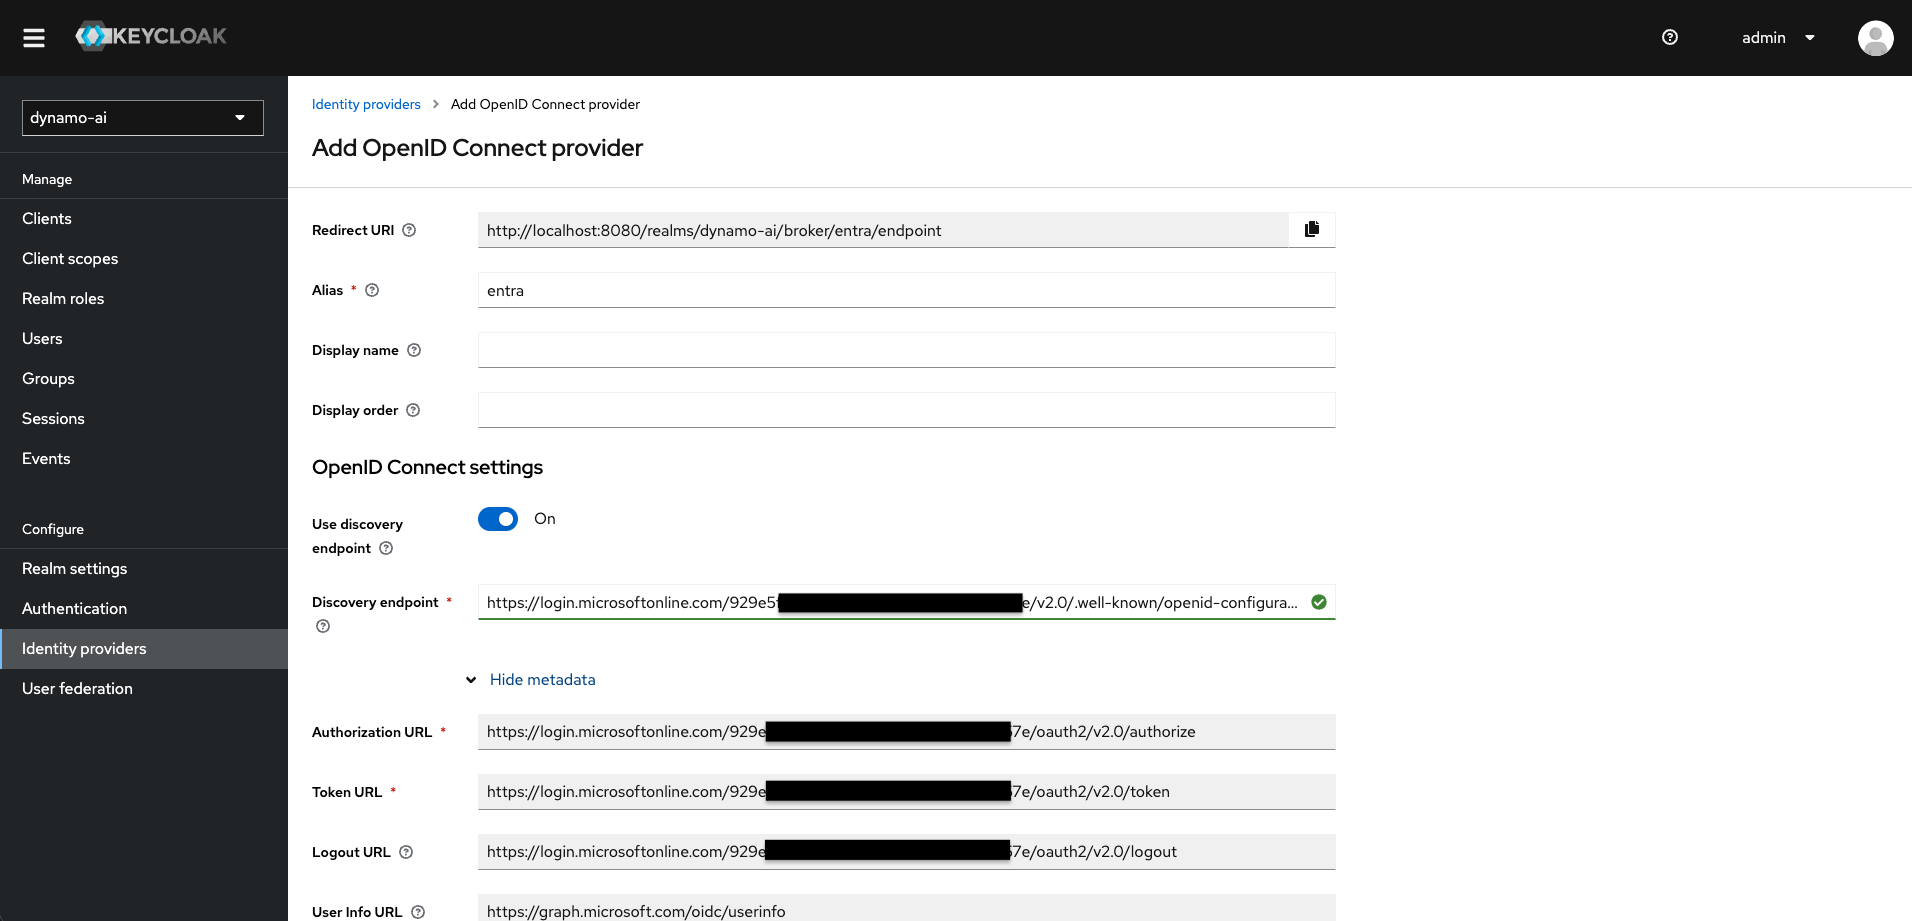
-
Confirm that the Authorization URL, Token URL, and JWKS URL fields are populated after import.
Click Show metadata if the fields are collapsed. The URLs should be filled in automatically from the discovery endpoint.
-
Fill in Client ID and Client Secret from Customer-Entra-ID. Set Client authentication to
Client secret sent as post, and enable Validate signatures and Use JWKS URL.To avoid storing the plaintext client secret in the Keycloak database, enter a vault expression (for example,
${vault.entra-client-secret}) instead of the secret value. See Storing OIDC Client Secrets via Vault.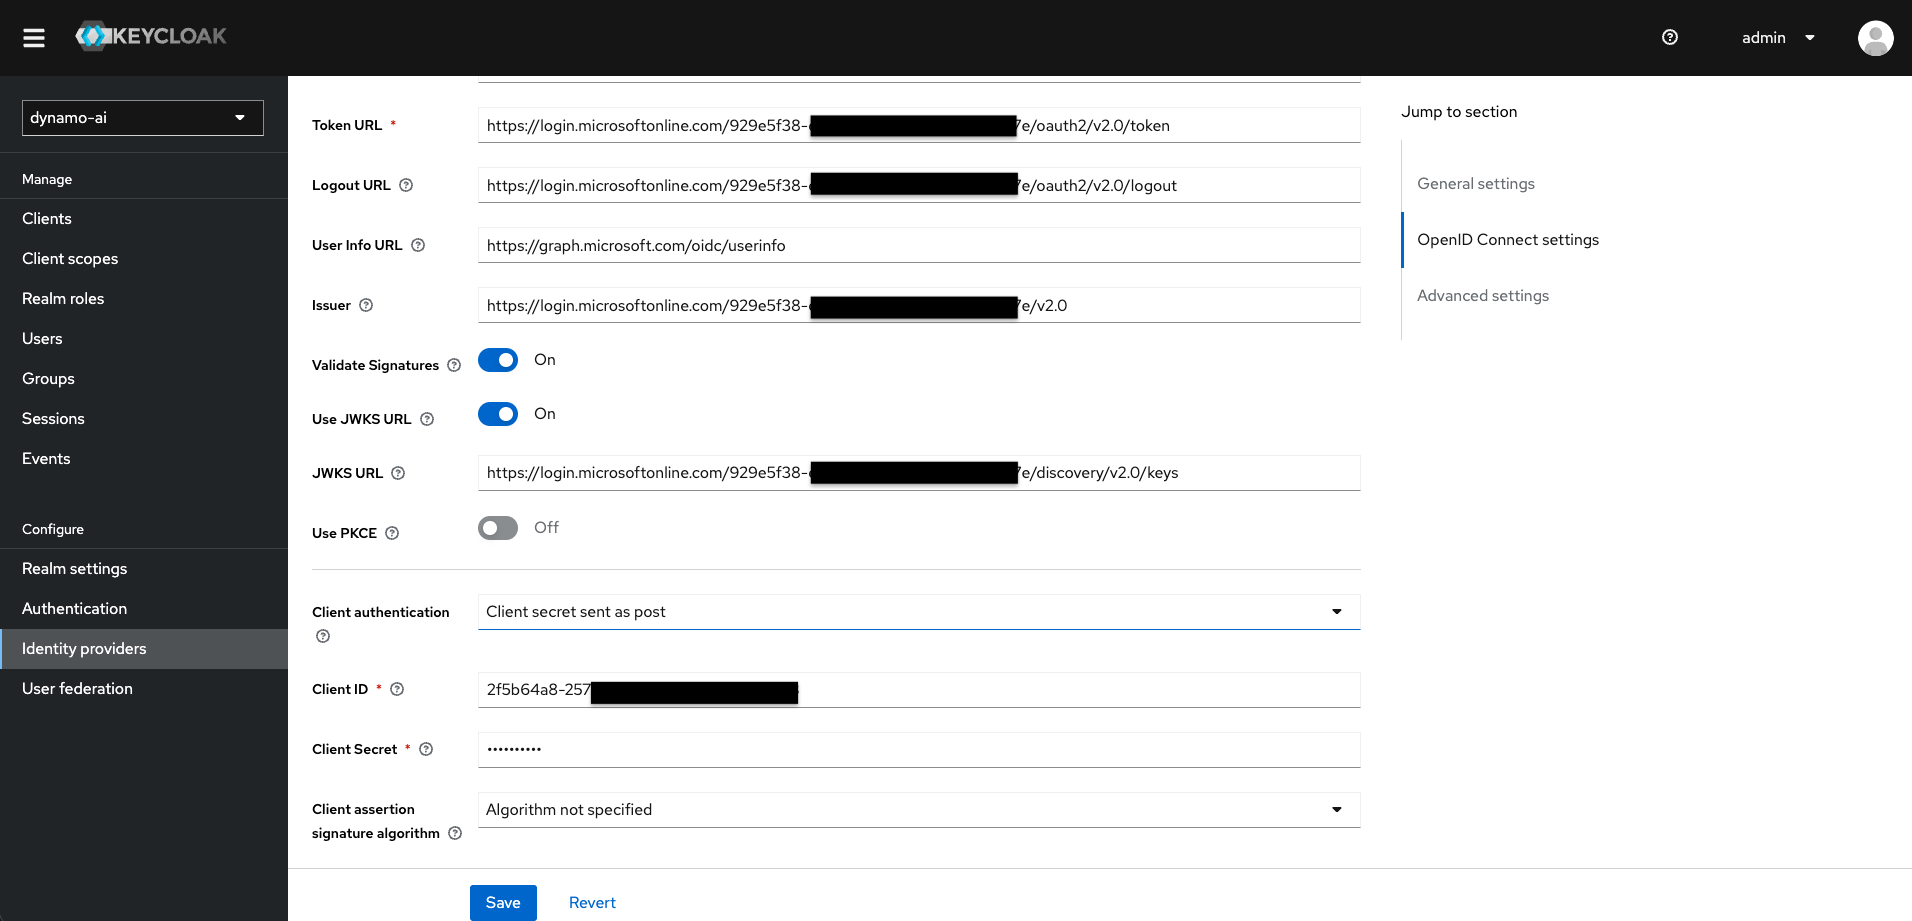
-
Set Scopes to
openid profile email.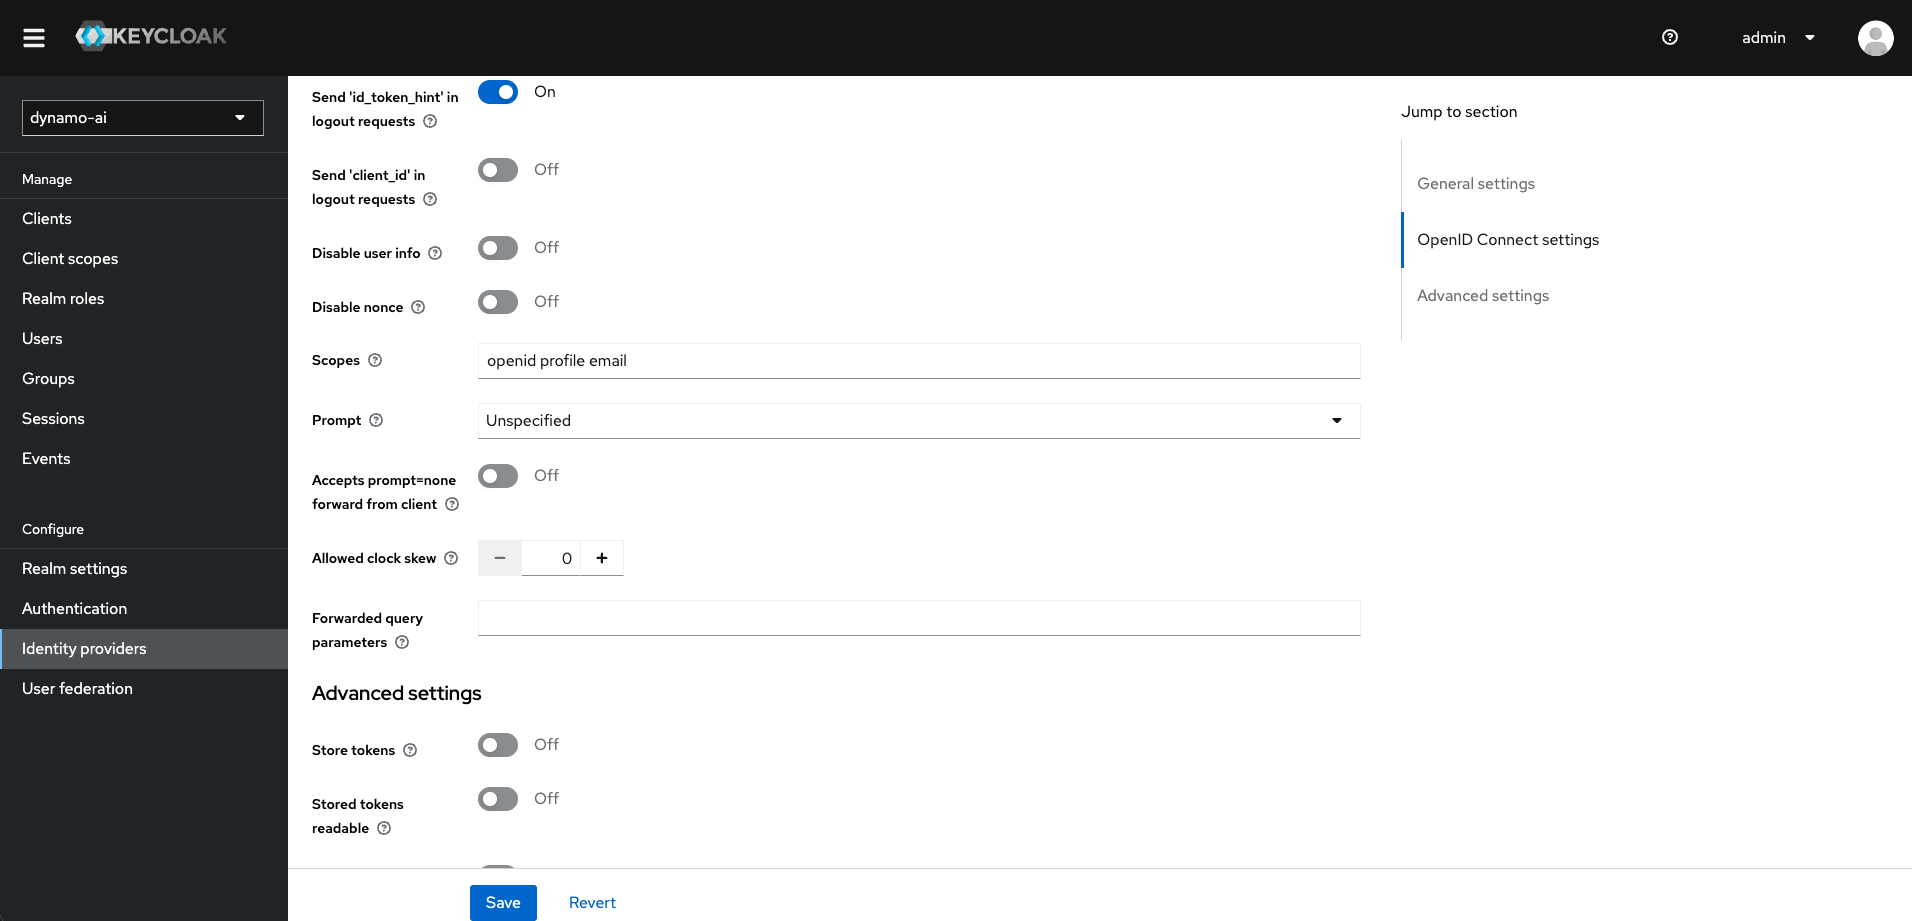
-
Click Add (or Save) to create the identity provider.
-
-
Add Mappers
For users to function correctly in DynamoAI, all users must:
- Be assigned at least one org-level role.
- Be part of the all-users group.
Users signing in via Entra ID for the first time will not have these by default. Configure mappers on the IdP to assign them automatically.
Follow the Adding Mappers guide to create the required mappers:
- role:org:dynamoeval:developer — Hardcoded Role mapper
- group:all-users — Hardcoded Group mapper
To assign DynamoAI roles from Entra ID security groups instead of a single hardcoded role, see Mapping Entra ID Security Groups to DynamoAI Roles.
Testing
-
Visit the DynamoAI login page. You should see your Entra ID provider listed (for example, Sign in with Microsoft or the alias you configured).
-
Click the IdP button. You should be redirected to the Microsoft sign-in page.
-
Sign in with a Customer-Entra-ID user account. After successful authentication, you should be redirected back to DynamoAI and logged in.
-
Verify in DynamoAI-Keycloak that the user was created under Users and that the mappers assigned the expected org-level role and all-users group membership.
Task-3 : Activate Each IdP User on the Platform
A successful sign-in provisions almost everything a federated user needs. Exactly one thing does not arrive automatically, and it is the one that gates the Policies tab.
| What the user needs | Provisioned automatically | By what |
|---|---|---|
| Keycloak account | Yes, at first sign-in | Keycloak first broker login |
all-users group membership | Yes, at every sign-in | the Hardcoded Group mapper from Task-2 |
| Org-level role | Yes, at every sign-in | the role mapper from Task-2 |
| Platform user record | Yes, on the first authenticated request | the platform |
user:<email> authorization policy | Yes, on every authenticated request | the platform, which recreates it if absent |
| DynamoGuard access | No | manual, and the subject of this task |
DynamoGuard access is a per-user configuration value rather than a role, so no Keycloak mapper can set it. Its default is UNACTIVATED. Until an administrator activates it, the user signs in successfully and then finds:
- no Policies tab, and
Policy user:<email> not foundwhen they try to create an AI System, if they have not yet loaded the application once.
Both read as permission problems. Neither is. Roles and group membership are already correct, and changing them has no effect.
Steps
-
Have the user sign in once and load the application. This is required first, and the ordering matters: the platform creates that user's Keycloak authorization policy from their own authenticated request. An administrator acting on their behalf does not trigger it, and running setup before this produces a partial success that reads as complete.
-
Run setup for the user, as a platform administrator:
Activate an IdP usercurl -s -X POST https://api.<domain>/v1/user/setup \
-H "Authorization: Bearer $ADMIN_TOKEN" \
-H 'Content-Type: application/json' \
-d '{"userId":"<application-user-id>"}'userIdis the application user id, not the Keycloak UUID — they are different identifiers for the same person. -
Confirm both steps succeeded:
{"success":true,
 "steps":[{"step":"POLICIES","status":"success"},
          {"step":"MODELS","status":"success"}]}
Both steps create that user's demo content. Neither is required for access, and both report
skippedwith codeSAAS_DISABLEDwhenDYNAMO_SAASis nottrue.
On 3.26.9 and later, nothing further is required. A federated user who has signed in and holds a DynamoGuard role sees the Policies tab.
Earlier releases gate that tab on a per-user configuration value defaulting to UNACTIVATED, which /v1/user/setup does not set. Activate it per user with POST /v1/config, namespace MODERATION, name dynamoGuardAccess, value ACTIVATED, and the affected user's userEmail. The caller needs org:iam:admin, and because the value is user scoped, confirm it as that user rather than as an administrator.
If a step fails, see Troubleshooting IdP Logins.
Related Guides
- Entra ID Groups Claim Overage — Fix missing
groupsclaims when users belong to many Entra security groups and Advanced Claim to Role mappers fail. - Storing OIDC Client Secrets via Vault — Keep the Entra client secret out of the Keycloak database by referencing a vault-backed value.
- Keycloak Web Console via IdP — General guide for IdP-based Keycloak Web Console access and disabling the default local admin user.
- Keycloak Web Console via Entra ID — Entra ID–specific setup. Use a separate Entra application (
keycloak-admin-console) in themasterrealm; application login (this guide) usesdynamoai-idpin thedynamo-airealm.