Keycloak Web Console Access via Entra ID
Goal
This guide enables Microsoft Entra ID users to authenticate to the DynamoAI-Keycloak Web Console through Entra ID, and describes the Entra-specific configuration required alongside the general steps in Keycloak Web Console via IdP.
For the purpose of this guide, we refer to:
- Customer-Entra-ID — Your Microsoft Entra ID tenant where users and groups are managed.
- DynamoAI-Keycloak — The DynamoAI application's Keycloak instance deployed in your environment.
Read Keycloak Web Console via IdP first for the motivation, the recommendation to disable (not delete) the default admin user, and why Keycloak Web Console access requires a separate Entra application from DynamoAI application login.
Overall Approach
With the naming convention above, we will perform three major steps:
- In Customer-Entra-ID, register a dedicated application for Keycloak Web Console access (separate from the
dynamoai-idpapplication in Entra ID as IdP). - In DynamoAI-Keycloak (
masterrealm), register Entra ID as an OpenID Connect Identity Provider following the same Keycloak configuration pattern as Entra ID as IdP — Task-2. - Apply Keycloak Web Console–specific settings: optionally Verify Essential Claim (if your tokens include a distinguishing claim), a mapper granting the global
adminrole, and disabling the default local admin user.
Tasks
Task-01 : Preparing Customer Entra ID for Keycloak Web Console Access
Pre-Requisites
-
Realm — All Keycloak configuration for Keycloak Web Console access is performed in the
masterrealm, notdynamo-ai. Confirm the realm selector in the top-left of the Keycloak Web Console showsmasterbefore proceeding with Task-2. -
Redirect URI — This is the redirect URL for the DynamoAI-Keycloak
masterrealm. You can find it when adding an Identity Provider in themasterrealm (see Task-2). The format is:https://<dynamoai-keycloak-domain>/realms/master/broker/<idp-alias>/endpoint -
Separate application — Do not reuse the
dynamoai-idpapplication from Entra ID as IdP. Register a new application (for example,keycloak-admin-console) for Keycloak Web Console access.
Steps
Follow Entra ID as IdP — Task-01 to register the application, create a client secret, and configure API permissions, applying the differences below.
NOTE: All steps are performed in Customer-Entra-ID (Azure Portal).| Setting | Application login (Entra ID as IdP) | Keycloak Web Console (this guide) |
|---|---|---|
| Application name | dynamoai-idp | keycloak-admin-console |
| Redirect URI | .../realms/dynamo-ai/broker/<idp-alias>/endpoint | .../realms/master/broker/<idp-alias>/endpoint |
In addition to the steps in Task-01, complete the following Keycloak Web Console–specific configuration.
-
Control Who Can Authenticate
By default, Entra ID allows any user in the tenant to sign in to a registered application unless you explicitly restrict access. For Keycloak Web Console access, you must tighten this so only intended administrators can authenticate.
Option A (recommended) — Require user assignment on the enterprise application.
-
In the Azure Portal, go to Microsoft Entra ID → Enterprise applications.
-
Search for and open the
keycloak-admin-consoleapplication (Entra ID creates an enterprise application automatically when you register the app). -
Go to Properties.
-
Set Assignment required? to Yes and click Save.
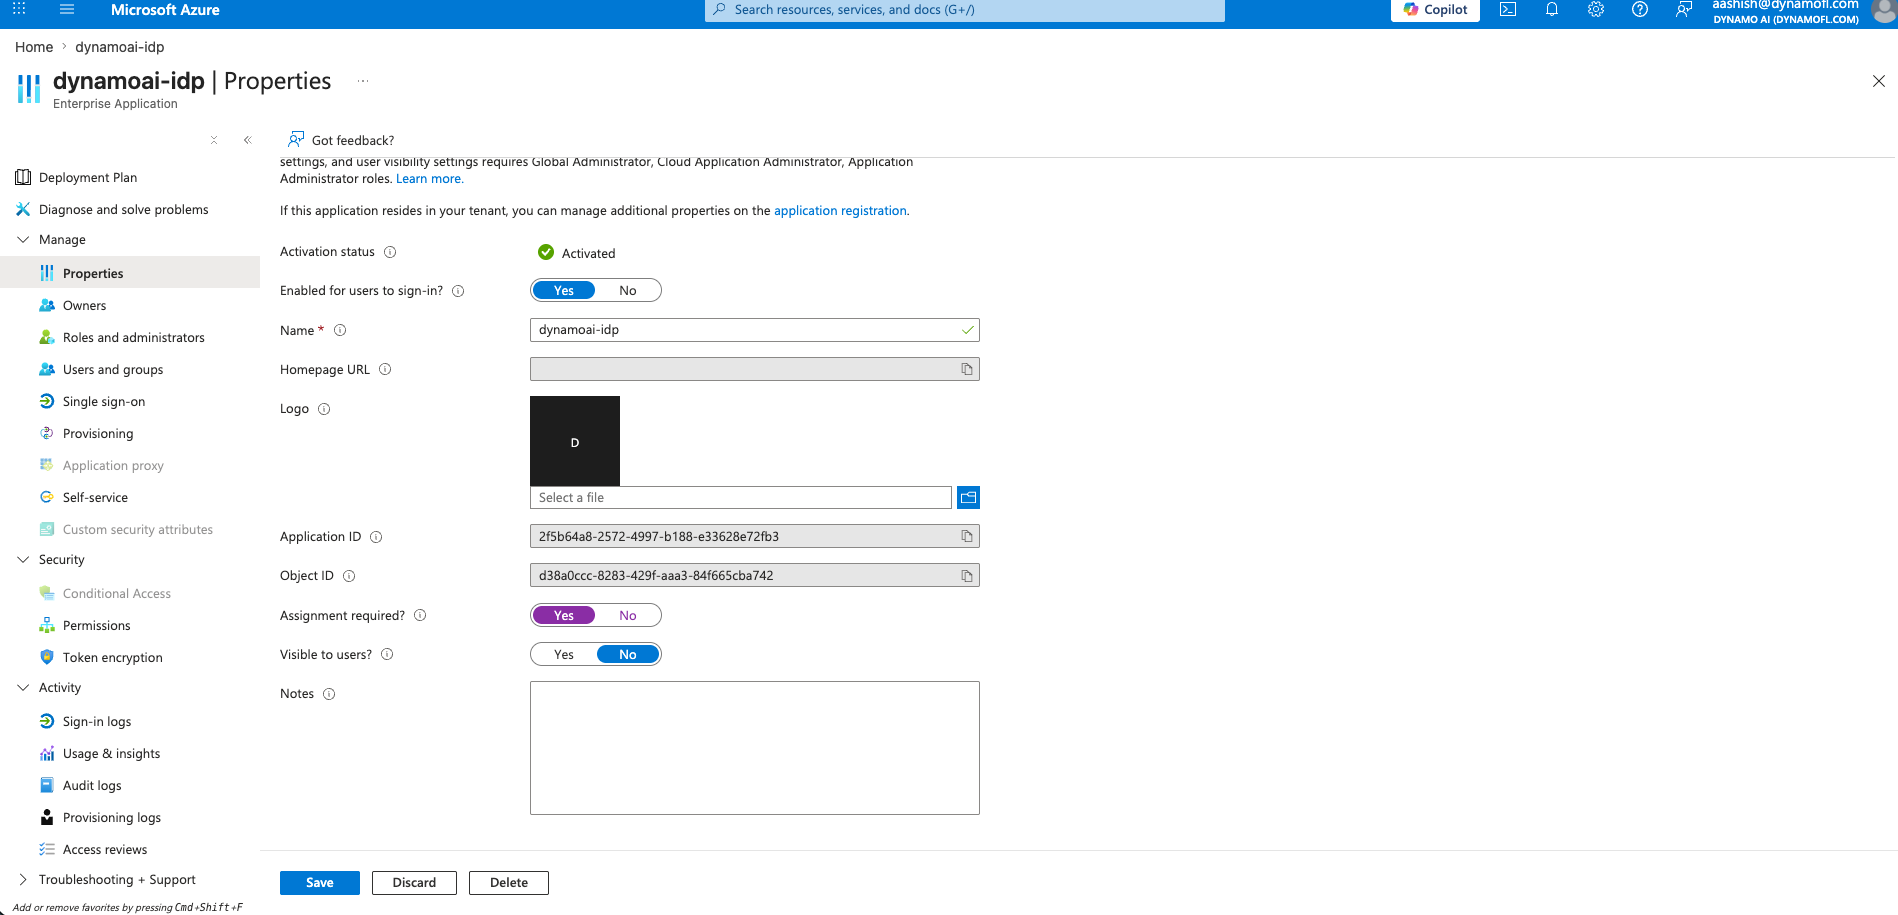
If Assignment required? is set to No, any user in your Entra ID tenant can initiate authentication against this application — even if they are not intended Keycloak administrators. Enabling assignment ensures only users or groups you explicitly grant access to can sign in.
-
Go to Users and groups and click Add user/group.
-
Assign only the security groups or individual users who should have Keycloak Web Console access.
Option B — Define App roles on the app registration (for example,
NOTE: Entra ID assignment controls who can attempt authentication against the application. It does not grant Keycloak administrative permissions. Even if a user is assigned and authenticates successfully, the Advanced Claim to Role mapper only assigns theKeycloakAdmin), assign them to users or groups, and use therolesclaim in Verify Essential Claim (see Task-3). You can combine Option B with Option A for defense in depth.adminrole when the ID token contains a matching claim. Users who authenticate without a matching claim will not receive any role and cannot use the Keycloak Web Console. Configure Verify Essential Claim in Task-3 if you also want to prevent such users from being added to Keycloak as federated accounts. -
-
Configure Group or Role Claims in the Token
If you plan to use Verify Essential Claim or the Advanced Claim to Role mapper, the ID token must include the claim you reference (for example,
groupsorroles). You must also ensure the corresponding client scope exists in themasterrealm — see Client scopes for claims. Skip this step if you are relying solely on Entra ID application assignment to control access and your mapper does not use claim-based matching.Using security groups:
-
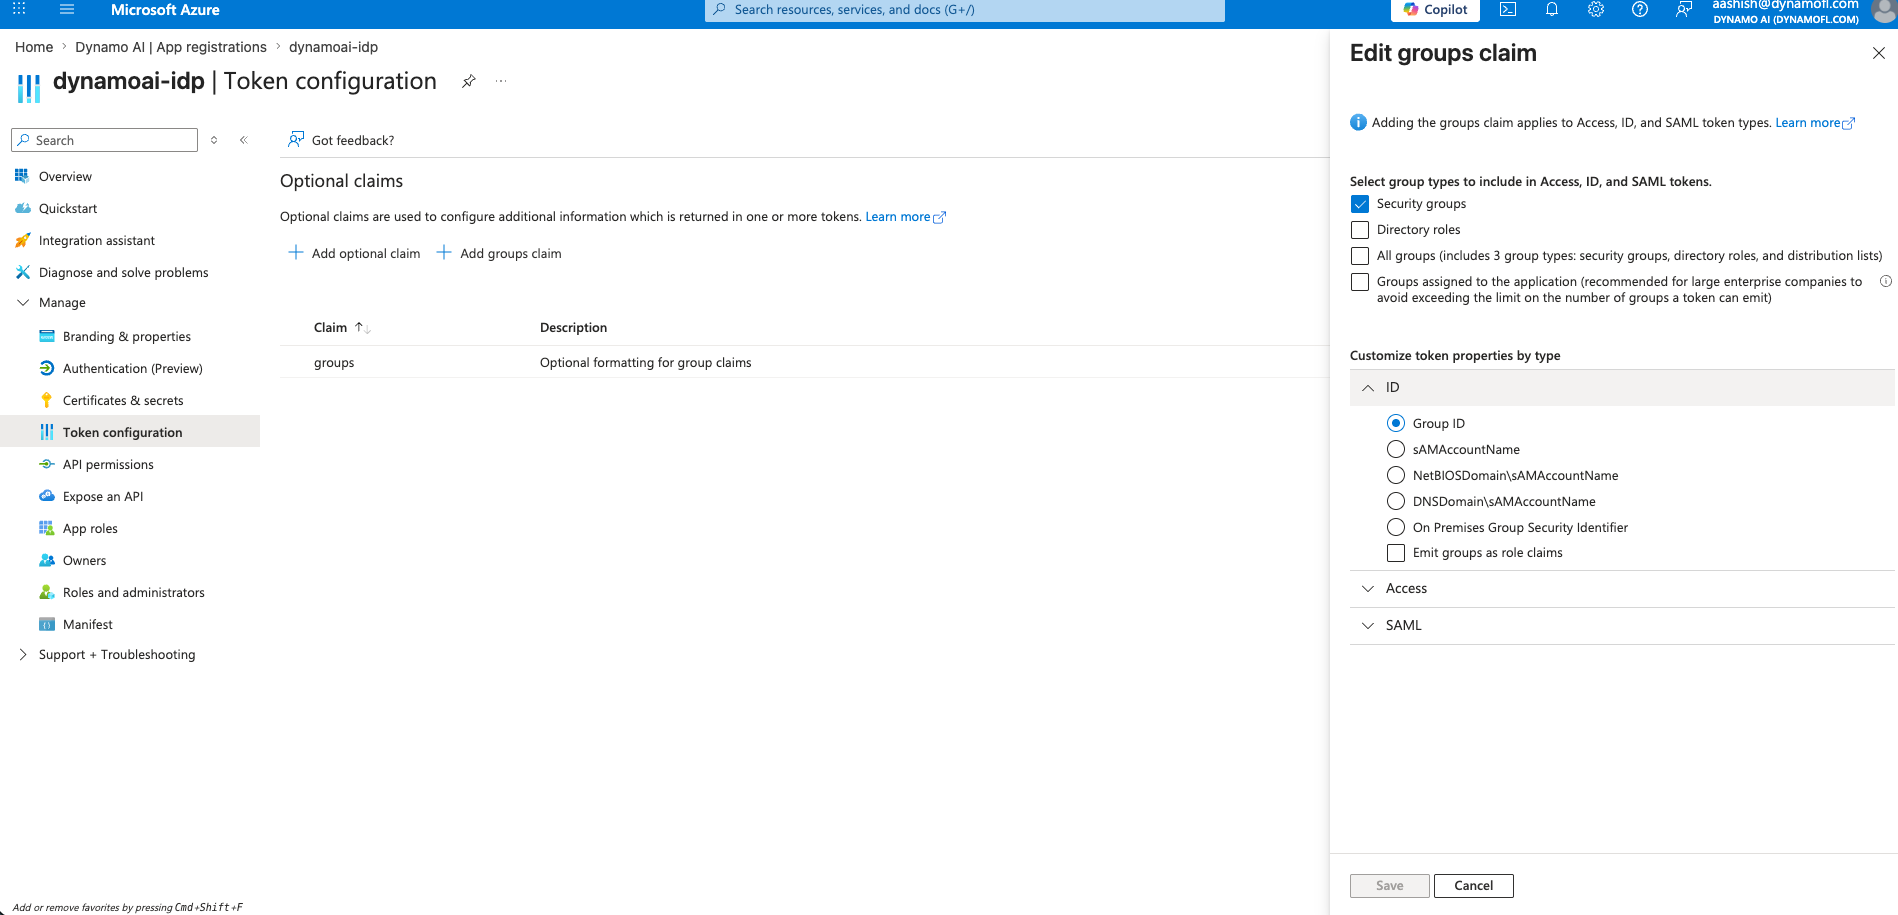
Go to Token configuration on the app registration.
-
Click Add groups claim.
-
Select Security groups (or the group type you use for authorization).
-
Under Customize token claims by group membership, choose Group ID or sAMAccountName depending on what you will match in Keycloak.
-
Save the configuration.
Using app roles:
- Go to App roles and create a role (for example,
KeycloakAdmin). - Assign the role to users or groups under Enterprise applications → Users and groups.
- Go to Token configuration and add the optional ID token claim for
roles.
-
Key Values
Keep the following values handy for Task-2. Replace <tenant-id> with your Directory (tenant) ID.
-
Discovery endpoint:
https://login.microsoftonline.com/<tenant-id>/v2.0/.well-known/openid-configuration -
Client ID: The Application (client) ID from the
keycloak-admin-consoleapp registration. -
Client Secret: The secret value created for the
keycloak-admin-consoleapplication.
Task-2 : Integrating Entra ID in Keycloak (master realm)
Follow Entra ID as IdP — Task-2: Integrating Entra ID in DynamoAI Application to add Entra ID as an OpenID Connect provider in Keycloak, applying the differences below.
NOTE: All steps are performed in DynamoAI-Keycloak.| Setting | Application login (Entra ID as IdP) | Keycloak Web Console (this guide) |
|---|---|---|
| Realm | dynamo-ai | master |
| Redirect URI | .../realms/dynamo-ai/broker/<idp-alias>/endpoint | .../realms/master/broker/<idp-alias>/endpoint |
| Client ID / Secret | From dynamoai-idp app | From keycloak-admin-console app |
| Discovery endpoint | From Task-01 Key Values | From Task-01 Key Values above |
| Suggested alias | entra | entra-admin |
| Suggested display name | Sign in with Microsoft | Sign in with Microsoft (Admin) |
Use the screenshots in Entra ID as IdP — Task-2 as a visual reference for adding the provider, configuring the discovery endpoint, and entering client credentials — the Keycloak UI steps are the same; only the realm and credentials differ.
NOTE: Do not add the application mappers from Entra ID as IdP — Task-2, step 4 (role:org:dynamoeval:developer, group:all-users). Those are for DynamoAI application users. Continue to Task-3 for the Keycloak Web Console mappers.
Task-3 : Keycloak Web Console–Specific Keycloak Settings
After completing Task-2, apply the Keycloak Web Console–specific configuration described in Keycloak Web Console via IdP:
-
Client scopes for claims — If you use claim-based configuration, ensure the
masterrealm has a client scope for each claim you reference (for example, create agroupsclient scope if one does not already exist). -
Verify Essential Claim — Optional. Use this if your Entra ID tokens include a
groupsorrolesclaim that distinguishes admin users, and you want to prevent users who lack the claim from being added to Keycloak as federated accounts.Without Verify Essential Claim, a user who is assigned to the Entra application and authenticates successfully may still be created in Keycloak — but the mapper in step 3 will not assign the
adminrole unless their token contains the matching claim. Verify Essential Claim goes further by rejecting authentication entirely for users without the claim, so they never appear under Users in themasterrealm.Example for Entra ID security groups:
Setting Value Verify essential claim ON Essential claim groupsEssential claim value .*<your-security-group-id>.*Replace
<your-security-group-id>with the Object ID of the Entra ID security group assigned to the application.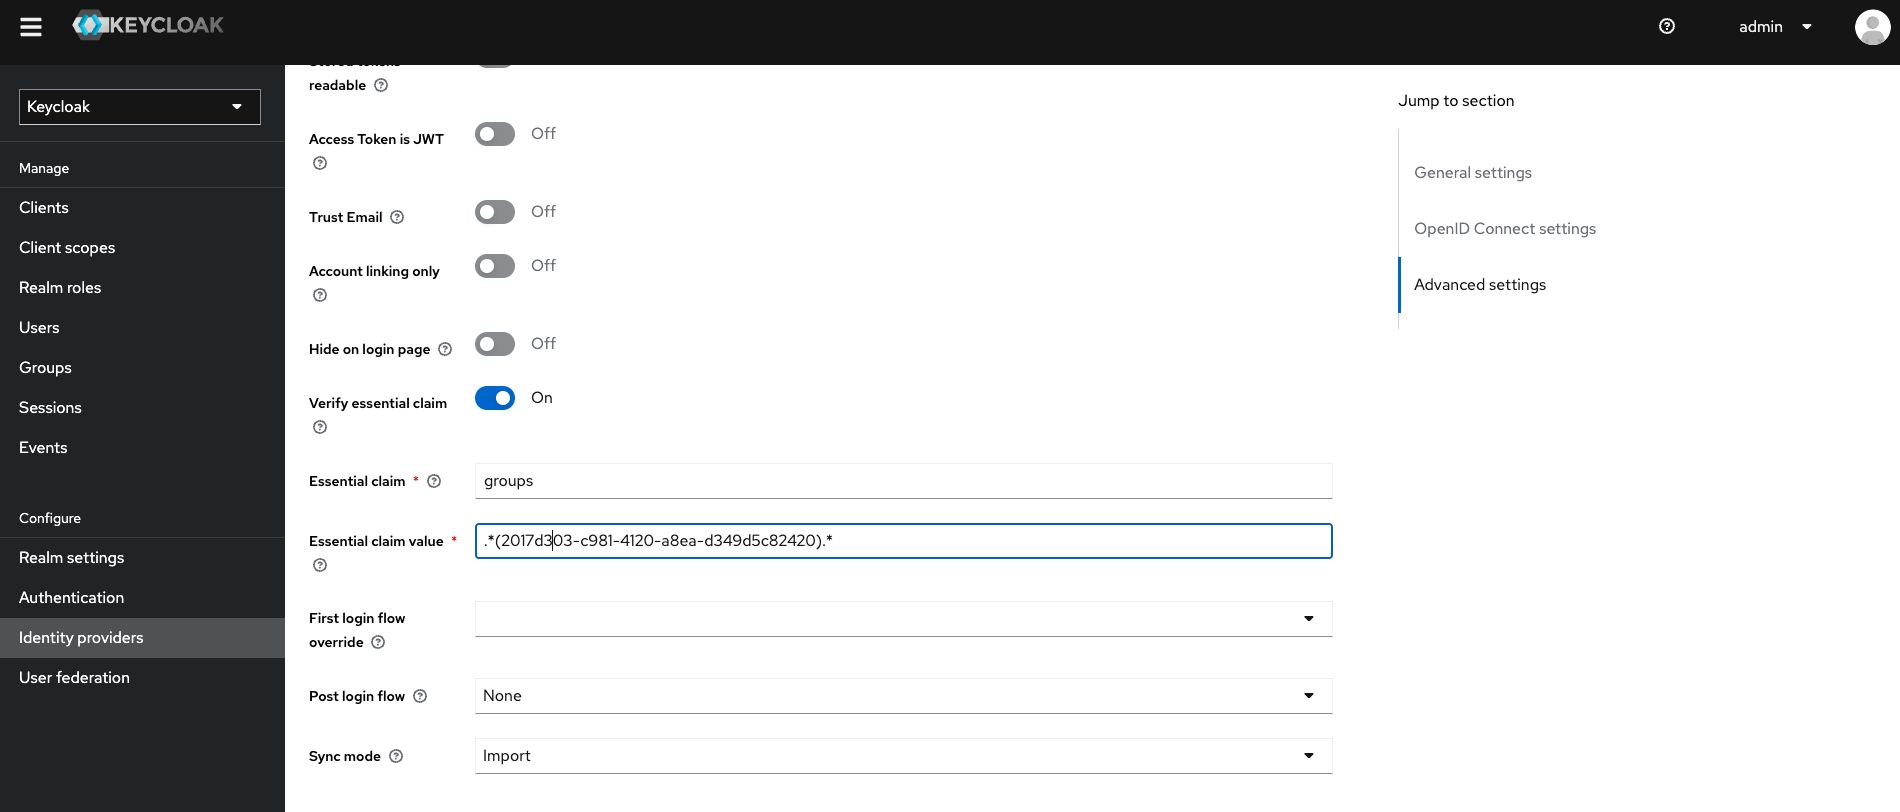
Example for Entra ID app roles:
Setting Value Verify essential claim ON Essential claim rolesEssential claim value .*KeycloakAdmin.* -
Full administrator mapper — Grant the global
adminrole in themasterrealm to replace the default local admin user. This mapper only assigns the role when the ID token contains a claim matching the configured value; authentication alone is not sufficient.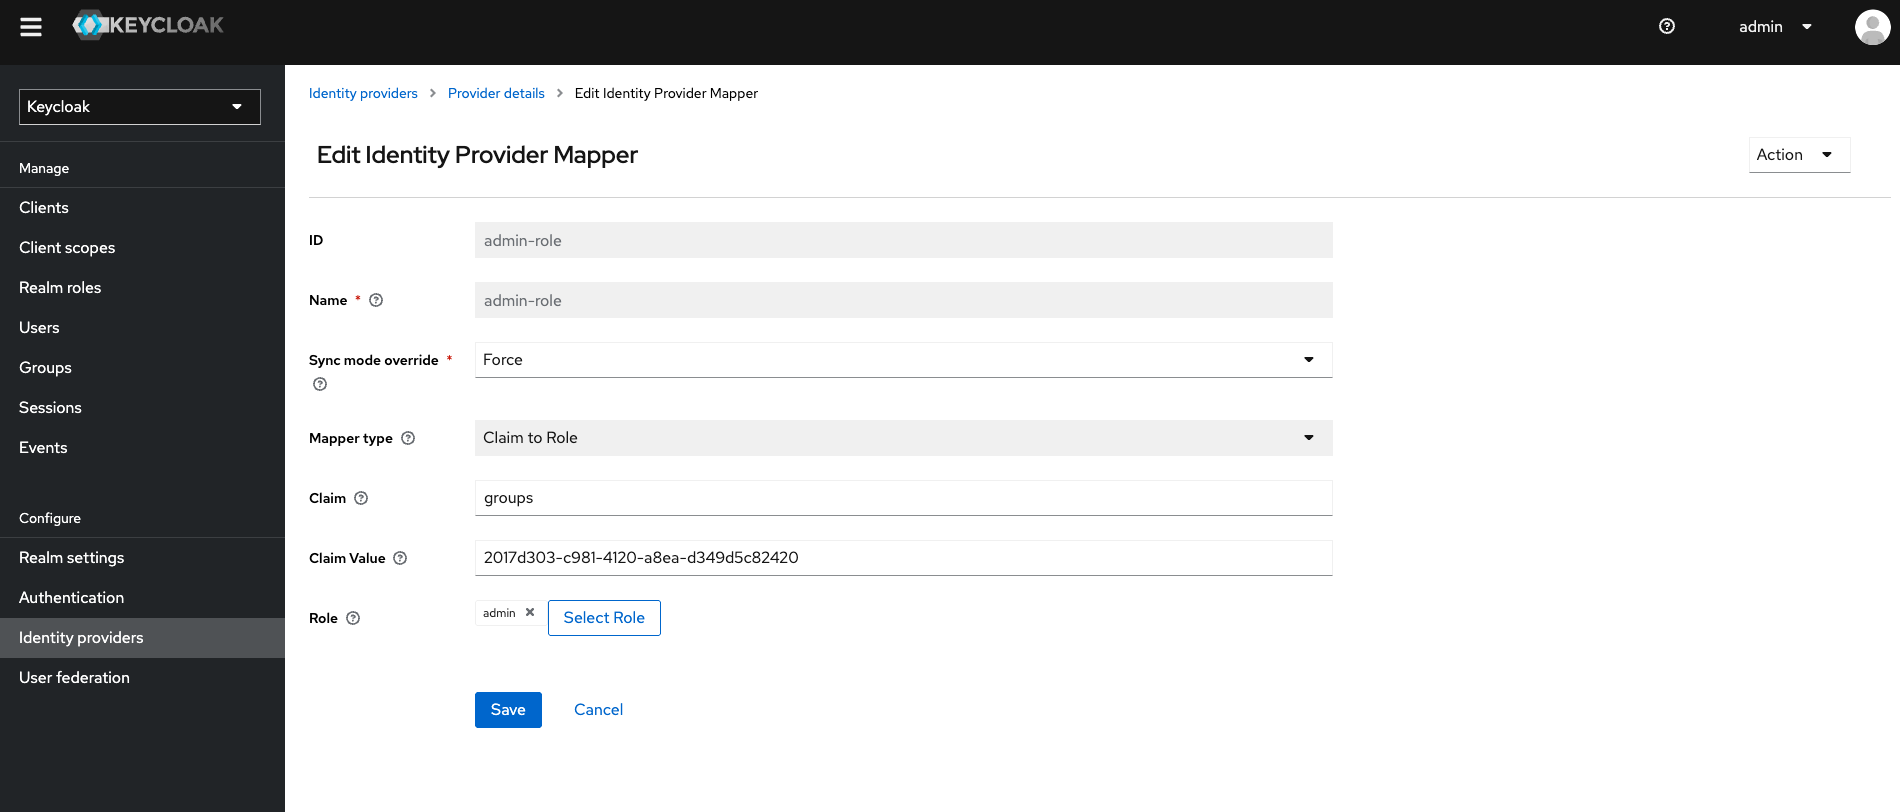
-
Disable the default admin user — After verifying IdP login works, disable the local
keycloak_adminaccount.
Testing
- Open the DynamoAI-Keycloak Web Console URL in a private browser window.
- Confirm the Entra ID provider appears on the login page (for example, Sign in with Microsoft (Admin)).
- Sign in with a Customer-Entra-ID user assigned to the enterprise application whose token contains the matching claim. You should reach the Keycloak Web Console with full administrator permissions.
- Sign in with a Customer-Entra-ID user who is not assigned to the enterprise application. Authentication should be rejected by Entra ID before reaching Keycloak.
- If you configured Verify Essential Claim, sign in with a Customer-Entra-ID user who is assigned to the application but whose token lacks the required claim. Authentication should fail at the IdP broker step and the user should not appear under Users in the
masterrealm. - If you did not configure Verify Essential Claim, sign in with an assigned user whose token lacks the matching mapper claim. The user may be created in Keycloak but should not receive the
adminrole and should not be able to use the Keycloak Web Console. - Attempt to sign in with the default local admin username and password. Authentication should fail because the user is disabled.
- In the
masterrealm, confirm federated users appear under Users only for sign-ins where authentication completed successfully.
Related Guides
- Keycloak Web Console via IdP — General IdP-agnostic concepts: motivation, separate application, Verify Essential Claim, admin role mappers, and disabling the default admin user.
- Entra ID as IdP — Entra ID integration for DynamoAI application login in the
dynamo-airealm. - Adding Mappers — Mapper concepts for the
dynamo-airealm application login.