Keycloak Web Console Access via IdP
Goal
This guide explains how to authenticate to the DynamoAI-Keycloak Web Console through your enterprise Identity Provider (IdP), and how to tighten security by disabling the default local Keycloak admin user.
For the purpose of this guide, we refer to:
- Customer-IdP — Your enterprise identity system (for example, Microsoft Entra ID, Okta, or another OIDC/SAML provider).
- DynamoAI-Keycloak — The DynamoAI application's Keycloak instance deployed in your environment.
For Entra ID–specific instructions, see Keycloak Web Console via Entra ID.
Why use an IdP for the Keycloak Web Console?
DynamoAI-Keycloak is deployed with a default local administrator account (configured at installation via keycloak_username / keycloak_password). This account authenticates directly against Keycloak and is not governed by your enterprise IdP policies.
Routing Keycloak Web Console access through your IdP lets you:
- Enforce your organization's authentication policies (MFA, conditional access, session lifetime, and so on).
- Centrally manage who can administer Keycloak through your existing identity lifecycle processes.
- Reduce reliance on a shared local credential that is difficult to rotate and audit.
- Disable the default local admin user once IdP-based access is verified, removing a standing local backdoor while retaining the option to re-enable it in an emergency.
Use a Separate IdP Application for the Keycloak Web Console
If you already integrated Customer-IdP for DynamoAI application login (see Entra ID as IdP or Keycloak as IdP), register a separate application or client for Keycloak Web Console access.
| Integration | Realm | Purpose | Redirect URI pattern |
|---|---|---|---|
| DynamoAI application | dynamo-ai | End-user login to DynamoAI | https://<keycloak-domain>/realms/dynamo-ai/broker/<idp-alias>/endpoint |
| Keycloak Web Console | master | Operator login to Keycloak Web Console | https://<keycloak-domain>/realms/master/broker/<idp-alias>/endpoint |
Keeping these integrations separate ensures:
- Least privilege — Application users and Keycloak administrators can be assigned different groups, roles, or app assignments in Customer-IdP.
- Independent lifecycle — You can rotate credentials, change redirect URIs, or revoke access for one integration without affecting the other.
- Clearer auditing — Sign-in logs in Customer-IdP distinguish application access from administrative access.
Overall Approach
The Keycloak Web Console authenticates against the master realm, not the dynamo-ai realm used by the DynamoAI application. The high-level steps are:
- In Customer-IdP, register a dedicated OIDC application for Keycloak Web Console access.
- In DynamoAI-Keycloak (
masterrealm), add Customer-IdP as an OpenID Connect Identity Provider. - Optionally configure Verify Essential Claim on the IdP if your Customer-IdP provides a claim that distinguishes admin users from other users. Ensure the corresponding client scope exists in the
masterrealm first. - Add an IdP mapper to grant the global
adminrole, replacing the access level of the default local admin user. - Verify IdP login works, then disable the default local admin user.
Pre-Requisites
- Access to the DynamoAI-Keycloak Web Console using the current default admin credentials.
- An OIDC-capable Customer-IdP.
- Familiarity with IdP integration concepts covered in Adding Mappers.
Task-1 : Configure IdP in the master Realm
NOTE: All steps in this task are performed in DynamoAI-Keycloak, in themaster realm. Confirm the realm selector in the top-left of the Keycloak Web Console shows master before proceeding.
Redirect URI
When adding the Identity Provider in the master realm, Keycloak displays the redirect URI you must configure in Customer-IdP. The format is:
https://<dynamoai-keycloak-domain>/realms/master/broker/<idp-alias>/endpoint
Replace <idp-alias> with the alias you choose when creating the provider.
Add the Identity Provider
The steps to open the Keycloak Web Console, select a realm, add an OpenID Connect provider, and configure the discovery endpoint, client credentials, and scopes are already covered in the IdP integration guides. Follow the guide that matches your Customer-IdP, applying the differences in the table below.
| Setting | Application login | Keycloak Web Console (this guide) |
|---|---|---|
| Realm | dynamo-ai | master |
| Redirect URI | .../realms/dynamo-ai/broker/<idp-alias>/endpoint | .../realms/master/broker/<idp-alias>/endpoint |
| Client ID / Secret | From your DynamoAI application integration | From your dedicated Keycloak Web Console application (not the DynamoAI application credentials) |
Which guide to follow:
- Entra ID or another OIDC IdP — Follow Entra ID as IdP — Task-2 to access Keycloak, add the provider, and configure the IdP via the discovery endpoint.
- Another Keycloak instance as IdP — Follow Keycloak as IdP — Task-2 to add and configure the provider.
For a complete Entra ID walkthrough including Keycloak Web Console–specific Entra configuration, see Keycloak Web Console via Entra ID.
NOTE: Do not add the application mappers from those guides (role:org:dynamoeval:developer, group:all-users). Those are for DynamoAI application users. Continue with the Keycloak Web Console–specific steps below.
Ensure Client Scopes for Claims
If you plan to use Verify Essential Claim or a claim-based Advanced Claim to Role mapper, each claim you reference (for example, groups or roles) must have a corresponding client scope in the master realm. The master realm does not include scopes such as groups by default — you must create them before the claim-based configuration below will work.
-
In the
masterrealm, go to Client scopes. -
Check whether a client scope already exists for the claim you intend to use. For example, if your IdP emits a
groupsclaim, confirm agroupsclient scope is present. -
If the scope does not exist, click Create client scope and configure it:
Setting Example for groupsName groupsType DefaultProtocol openid-connectInclude in token scope On
Repeat for each claim your Verify Essential Claim or Advanced Claim to Role mapper references (for example, create a roles client scope if you use the roles claim).
master realm, Keycloak may not surface the claim during the IdP broker authentication flow, and your Verify Essential Claim or role mapper configuration will not behave as expected — even if the claim is correctly configured in your external IdP.
Restrict Access with Verify Essential Claim
Without additional controls, any user who can complete the OIDC authentication flow at Customer-IdP may be federated into the master realm on first login — even if they are not intended to administer Keycloak. These users are created as records in Keycloak under Users, even though they have no administrative permissions.
The Advanced Claim to Role mapper in the next step only assigns the admin role when the ID token contains a matching claim. A user who authenticates but does not satisfy the mapper's claim criteria will not receive any administrative role and cannot use the Keycloak Web Console — but they will still exist as a federated user in Keycloak.
Verify Essential Claim addresses this gap. It checks that the ID token contains a specific claim matching an expected value before the user is authenticated or imported into Keycloak. Users who do not satisfy the check are rejected outright and are not added to Keycloak at all. Use this when you want to prevent unintended users from accumulating as federated accounts in the master realm, not merely block them from receiving a role.
This setting is only applicable if your Customer-IdP includes a claim in the ID token that the users you want to grant Keycloak Web Console access to share — for example, a groups claim for a dedicated admin security group, or a roles claim for an app role. Ensure the corresponding client scope exists in the master realm before configuring this step. If no such distinguishing claim exists in your IdP tokens, skip this step and rely on your IdP's application assignment controls (such as Entra ID Assignment required? on the enterprise application) to limit who can attempt login. In that case, the mapper alone governs whether the admin role is granted.
- Open the Identity Provider you just created and locate Verify essential claim.
- Enable Verify essential claim.
- Set Essential claim to the JWT claim your IdP uses to convey authorization (commonly
groupsorroles). Claim names are case-sensitive. - Set Essential claim value to a regular expression that matches only authorized users.
Example — Allow users whose groups claim contains 2017d303-c981-4120-a8ea-d349d5c82420:
| Setting | Value |
|---|---|
| Verify essential claim | ON |
| Essential claim | groups |
| Essential claim value | .*(2017d303-c981-4120-a8ea-d349d5c82420).* |
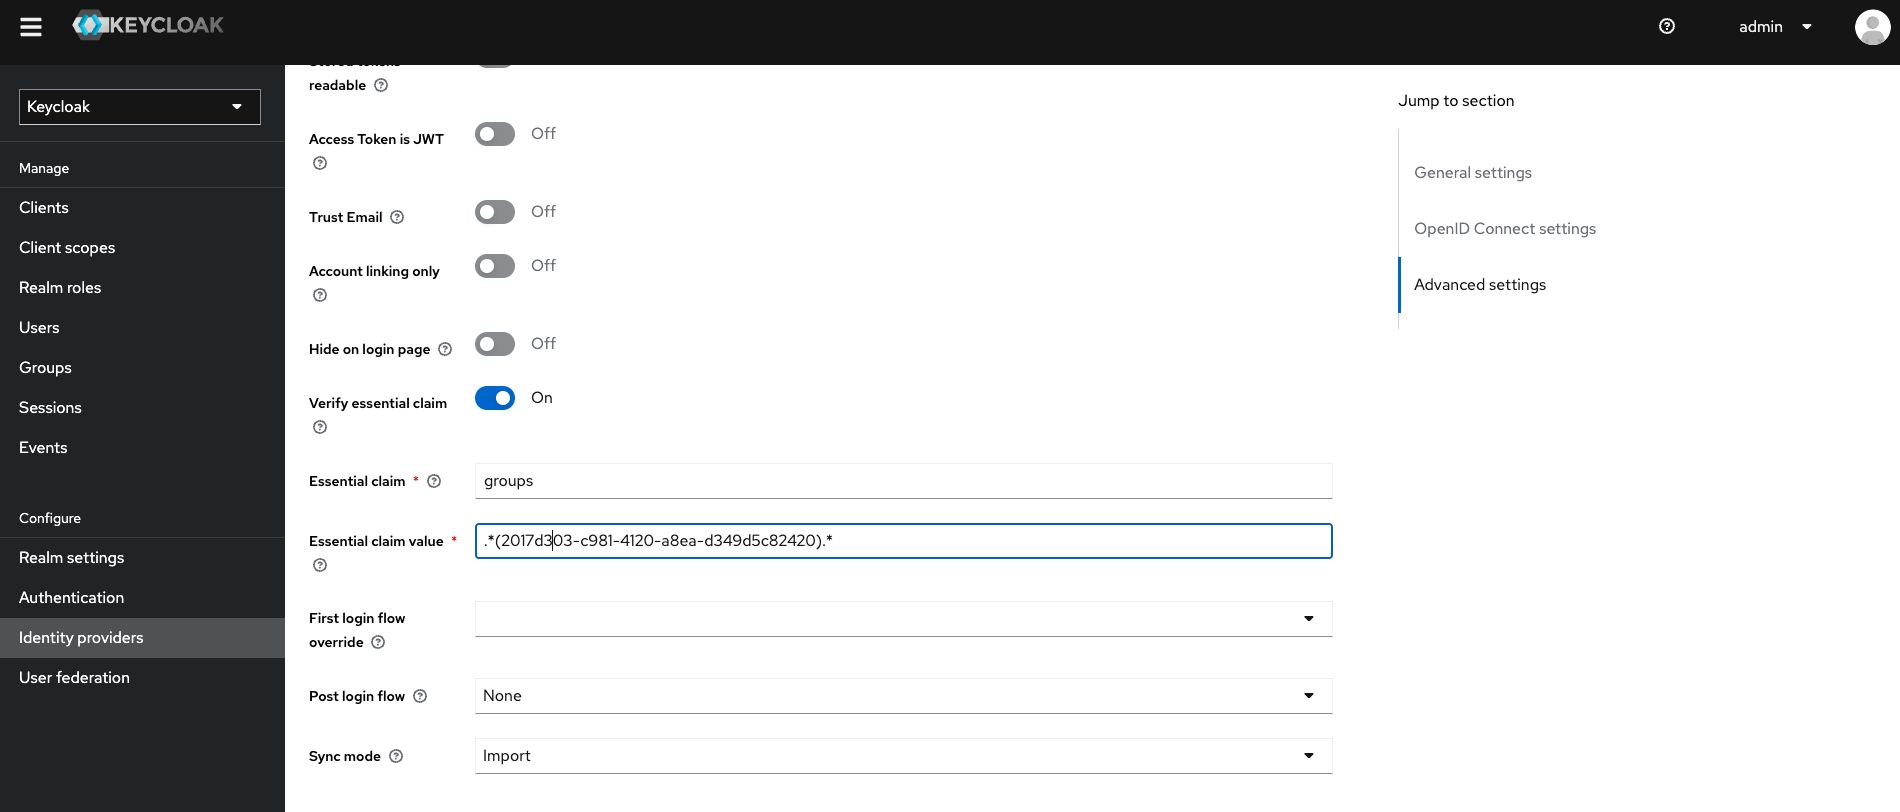
If the claim is an array, Keycloak evaluates the regex against the stringified claim value. Users who do not satisfy the claim check are denied authentication and are not imported into Keycloak.
Add Mapper for Full Administrator Access
Users who authenticate via the IdP need the global admin realm role in the master realm to fully replace the default local admin user. Ensure the corresponding client scope exists in the master realm for any claim you reference in this mapper. Add an Advanced Claim to Role mapper on the IdP:
| Attribute | Value |
|---|---|
| Name | keycloak-admin |
| Mapper Type | Advanced Claim to Role |
| Claims | groups (or the claim your IdP provides) |
| Claim value | 2017d303-c981-4120-a8ea-d349d5c82420 (or your authorized group identifier) |
| Role | admin (realm role in master) |
| Sync Mode Override | Inherit |
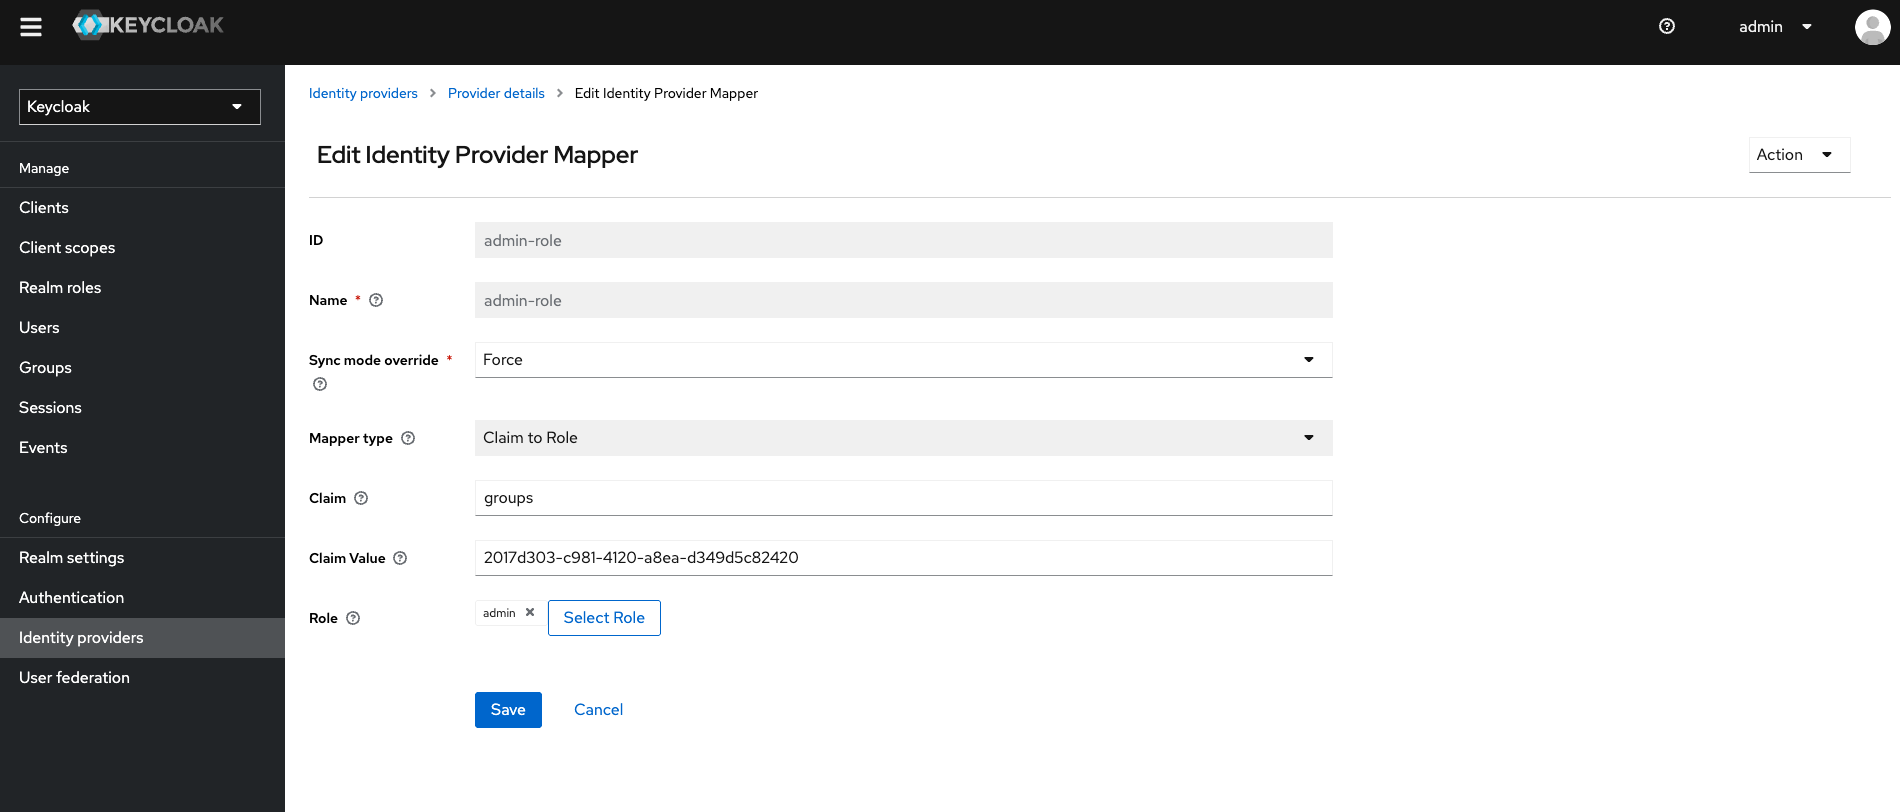
This mapper grants the admin role only when the ID token contains a claim matching the configured value. A user who authenticates successfully but whose token does not contain the matching claim will not receive the admin role and will not be able to use the Keycloak Web Console. Configure Verify Essential Claim as well if you also want to prevent such users from being created in Keycloak in the first place.
See the Keycloak Server Administration Guide for details on the admin role and master realm access control.
Disabling the Default Admin User
After you have verified that authorized users can sign in to the Keycloak Web Console through Customer-IdP:
- In the
masterrealm, go to Users. - Search for the default admin user created at installation (the value of
keycloak_usernamein your deployment configuration, commonlykeycloak_admin). - Open the user profile and set Enabled to OFF.
- Click Save.
Testing
- Open the DynamoAI-Keycloak Web Console URL in a private browser window.
- Confirm the Customer-IdP option appears on the login page.
- Sign in with a user whose token contains the claim matching the mapper. You should reach the Keycloak Web Console with full administrator permissions.
- Sign in with a user who authenticates but whose token does not contain the matching mapper claim. The user should not receive the
adminrole and should not be able to use the Keycloak Web Console. - If you configured Verify Essential Claim, sign in with a user who lacks the required claim. Authentication should fail at the IdP broker step and the user should not appear under Users in the
masterrealm. - Attempt to sign in with the default local admin username and password. Authentication should fail because the user is disabled.
- In the
masterrealm, confirm federated users appear under Users only for sign-ins where authentication completed successfully.
Related Guides
- Keycloak Web Console via Entra ID — Entra ID–specific setup for Keycloak Web Console access.
- Entra ID as IdP — IdP integration for DynamoAI application login in the
dynamo-airealm. - Keycloak as IdP — Using another Keycloak instance as IdP for application login.
- Adding Mappers — Mapper concepts and configuration for the
dynamo-airealm. - Default IdP Redirect — Auto-redirecting application login to an external IdP.