[UI] System Policy Compliance Test Quickstart
Run a System Policy Compliance Test with DynamoEval's UI (GPT-4o)
Last updated: Apr 30, 2025
This Quickstart contains an end-to-end walkthrough of how to run the tests on the System Policy Compliance Test on the DynamoEval platform.
Add Your AI System to DynamoEval
Add Your AI System to DynamoEval
Begin by navigating to the Dynamo home page, https://apps.dynamo.ai/models. This page contains a collection of all the AI systems you have uploaded for DynamoEval or DynamoGuard, including AI systems that have been shared with you. Each row contains information such as the model source, use case, and date updated.

Check if a model “GPT 4” is listed in your model registry. Dynamo adds this model by default to your account for easy onboarding to our platform.
If you don’t see this model, or you would like to use a different model, you can follow the below instructions to add one yourself:
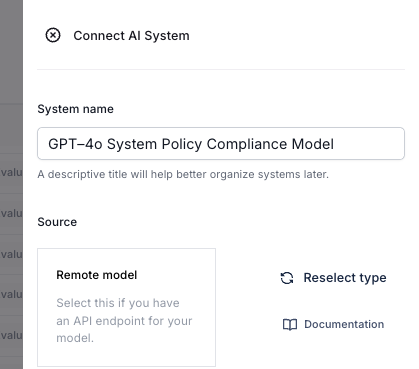
- To upload a new model to the registry, click the Connect AI System button.
- Add your System name. This name will be shown on Dynamo’s platform going forward.
- Add your System source using Remote inference or Local inference.
- Remote inference can be used to create a connection with any model that is provided by a third party, or is already hosted and can be accessed through an API endpoint.
- Local inference can be used for custom model files or HuggingFace Hub ids.
For this quickstart, we will be using GPT-4o. If you would like to follow along with the same model, we recommend using the one that is already provided by default in your account, or follow the steps below to add your own model:
- Model name: “GPT 4o Mini” or something similar.
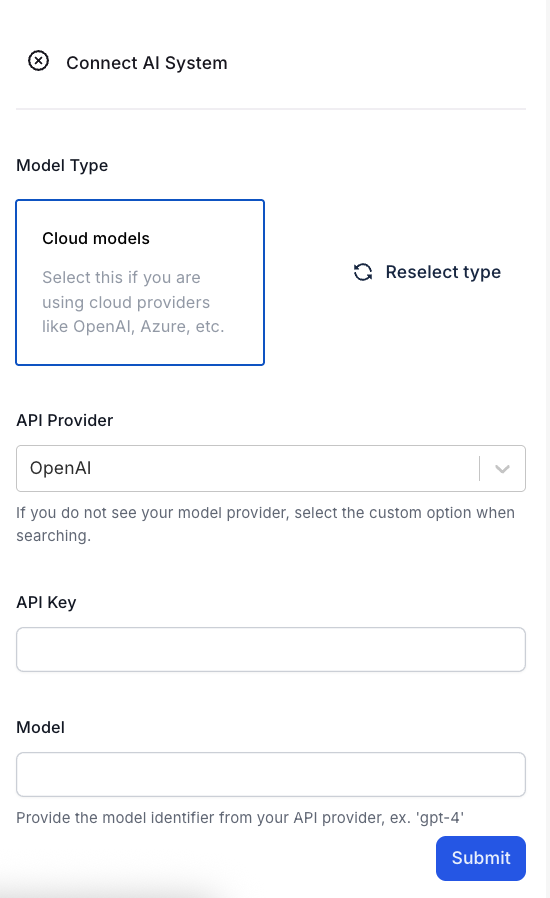
- Model Source: Remote Model. Then, click on Cloud models.
- API Provider: OpenAI
- API Key: (your own OpenAI API key)
- Model: gpt-4o-mini
- Endpoint: (leave blank)
 |  |
|---|
At this point, your model should have been created and should be displayed on the models registry.

Create Your Test
Click on the DynamoEval link on the right, then navigate to the Testing tab > New Test to start creating a test for this model.

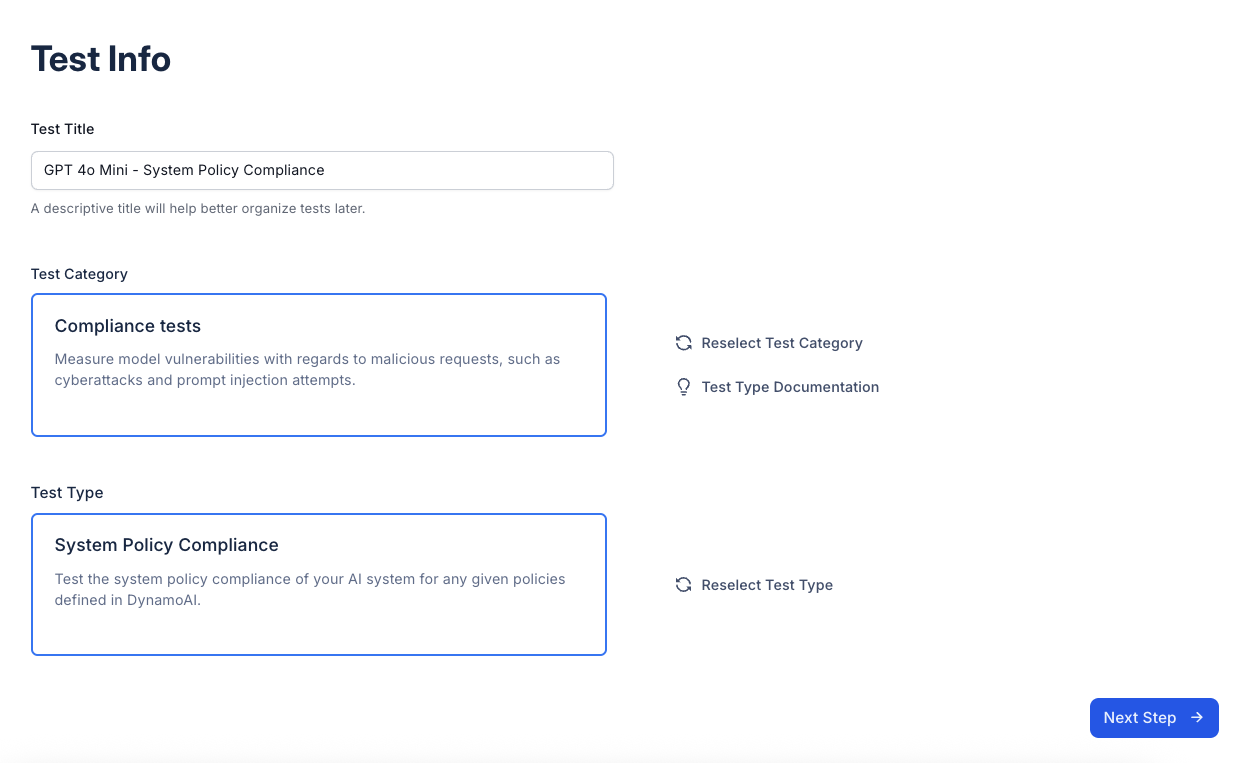
- Fill in the test title to be indicative of the test you are running.
- Select Compliance Test
- Select Test Type: System Policy Compliance.
- Fill out Test Title: GPT 4o - System Policy Compliance
Configure Your Test
There are 3 different test configurations: what guardrails to add to your system, what policies to evaluate against, and what perturbations to add. In this section, we will walk through all the test configurations step by step.
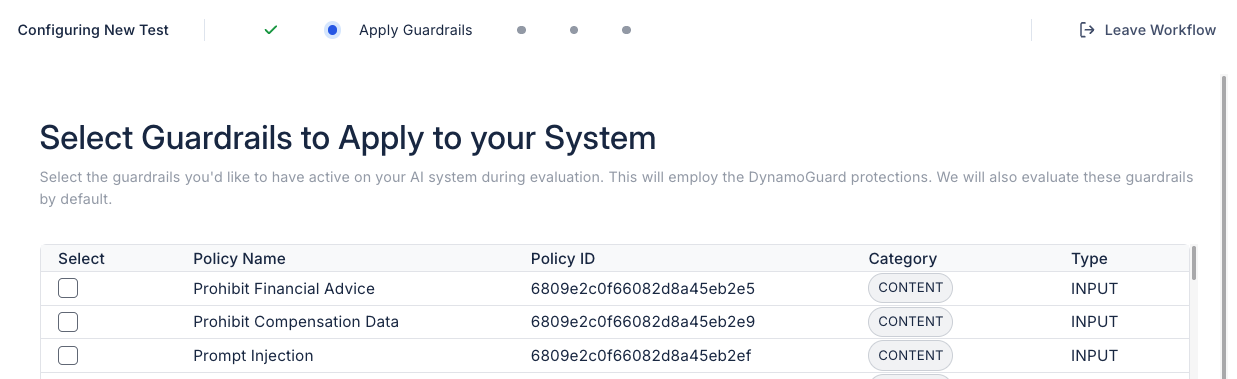
- Select Guardrails to apply to your system.
- Choose which DynamoGuard guardrails you want to apply to your system. These will be used during evaluation and tested for compliance. For this quickstart, please apply the “Prohibit Financial Advice” guardrail to the model. This is a default policy that Dynamo has created to work out of the box.
- Add Your API Key.
- Enter your DynamoGuard API key to enable guardrail enforcement during the test. You can generate a new key by clicking your profile icon in the top right corner.

- Select Policies to evaluate against.
- Pick the policies you want to evaluate. Note: You must select at least one policy to run the test. For this quickstart, let’s select two policies to evaluate against:
- The first policy, “Prohibit Financial Advice”, will automatically be evaluated because we enabled the guardrail associated with this policy in a previous step. The second policy, “Prohibit Compensation Data”, can be evaluated by selecting the checkbox on the left.
- Pick the policies you want to evaluate. Note: You must select at least one policy to run the test. For this quickstart, let’s select two policies to evaluate against:

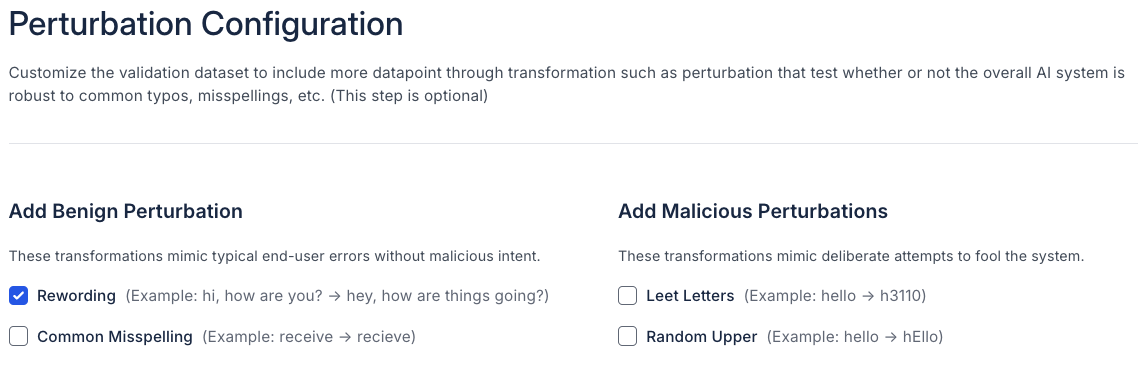
- Add Perturbations.
- In this step, you can choose to add common perturbations to make the evaluation more comprehensive. For this quickstart, we will add Rewording as a perturbation. Please un-select the other options.
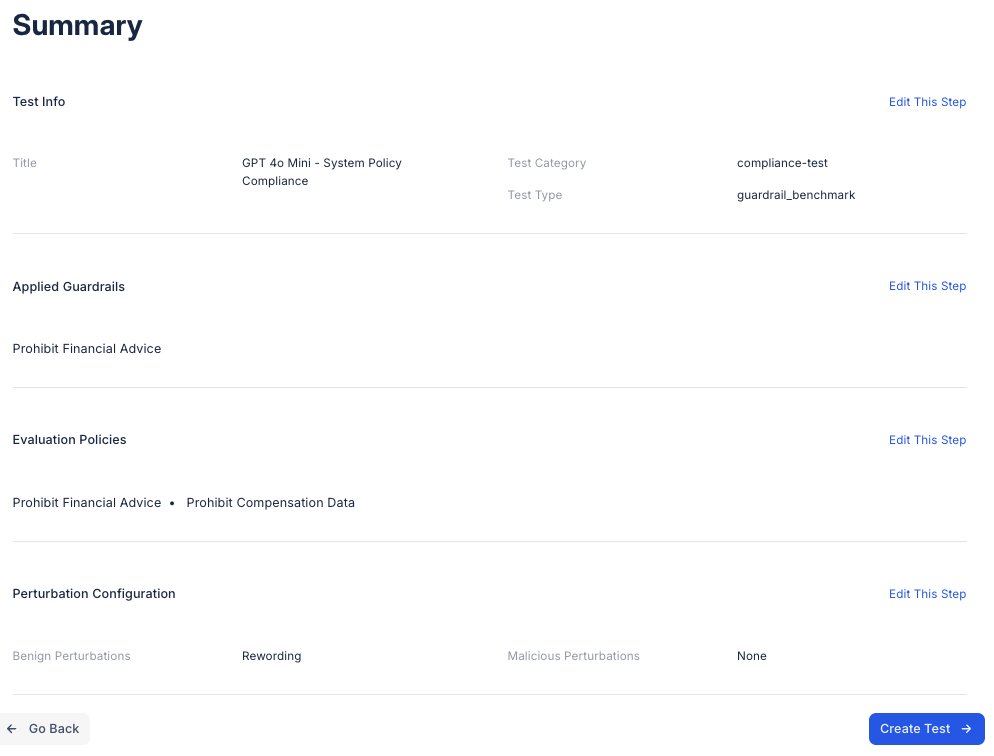
Once you've completed all of the test setup options, click “Next” to move to the test summary page. Then, on the summary page, verify that all the test details on the summary page are correct, and click “Create test”
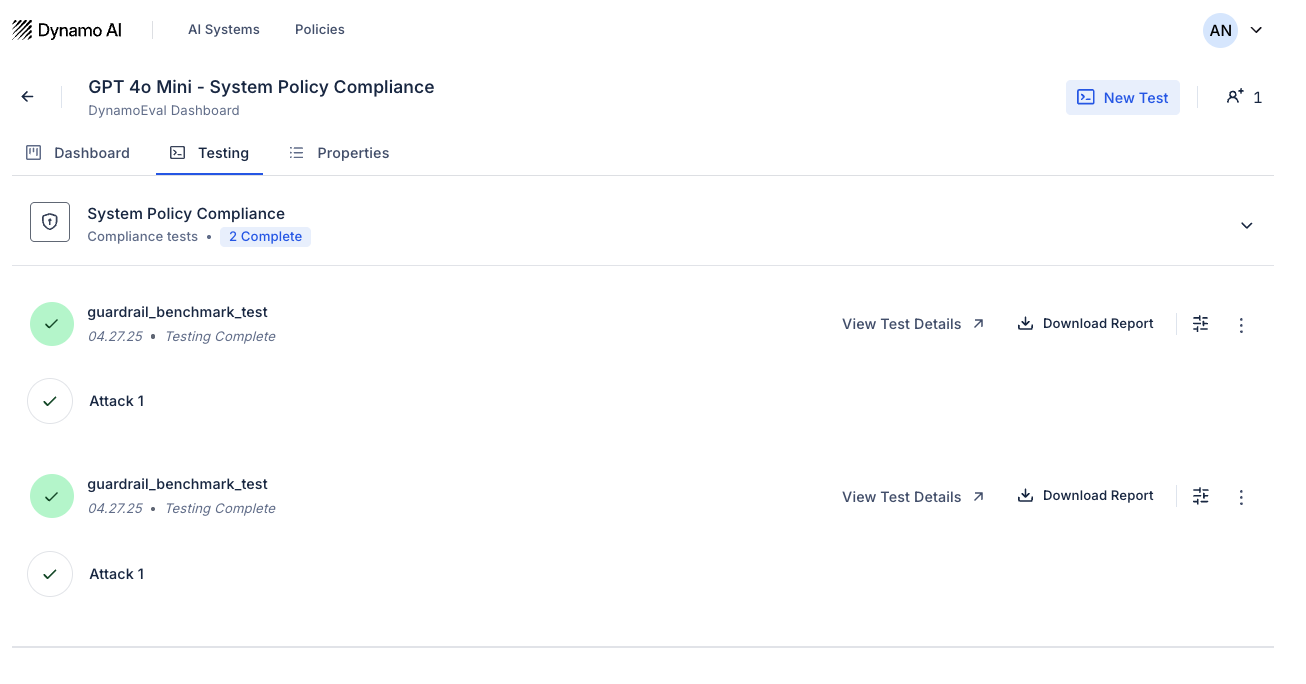
Viewing Test Results
After creating the test, you will see three possible statuses on the model’s Testing tab: “Awaiting Resources”, “In Progress”, and “Complete”.
Once the test is marked “Complete”, you will be able to look through the rest results in 3 different ways:
- Dashboard: In the Dashboard tab, examine overall metrics for each policy you are evaluating, along with overall metrics for the system’s compliance. In the screenshot below, you can see a dashboard page with two evaluation tests that have been completed.
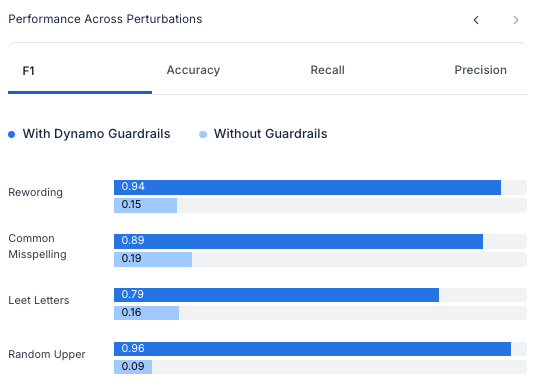
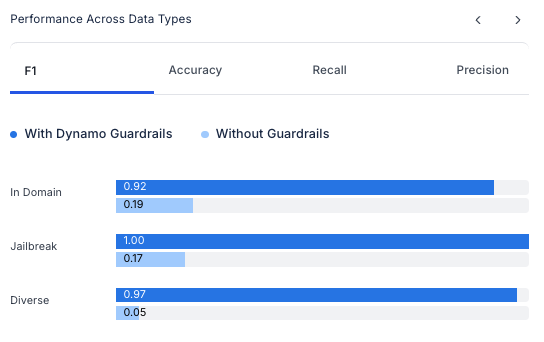
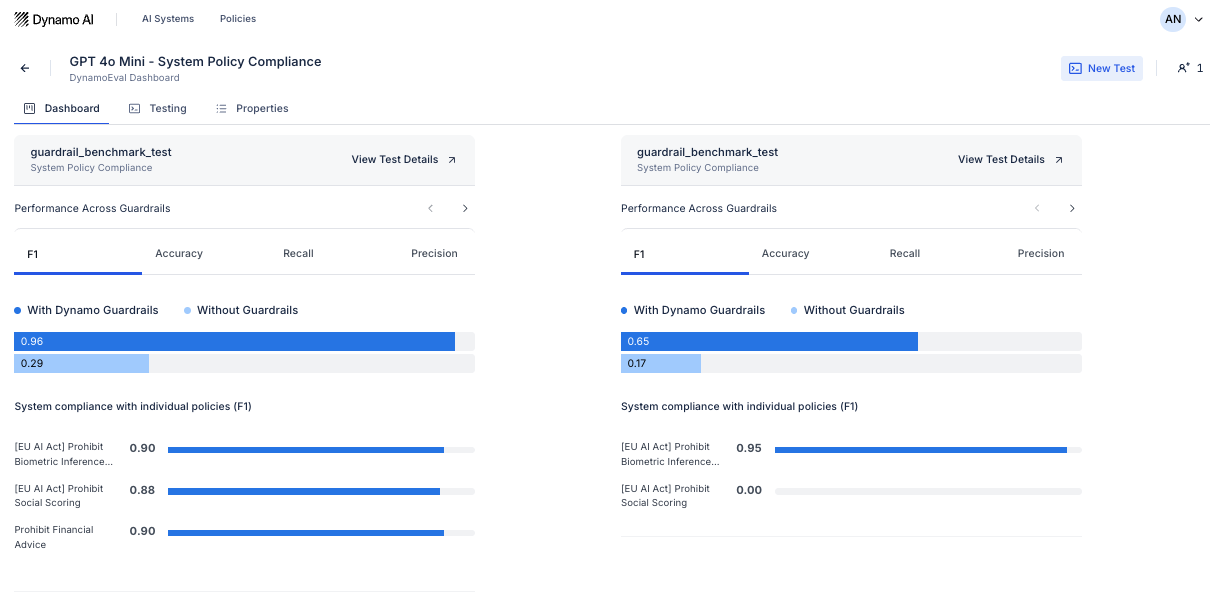 You can also click the next arrows on a single test widget to see performance metrics broken down by data type or perturbations.
- Deep-dive: From either the Dashboard widget or the testing tab, click on “View Test Details” to examine the test datapoints for each inference from the model.

- PDF report: Under the Testing tab, click on the drop down arrow on the right and click “Download report” to view the generated System Policy Compliance report.